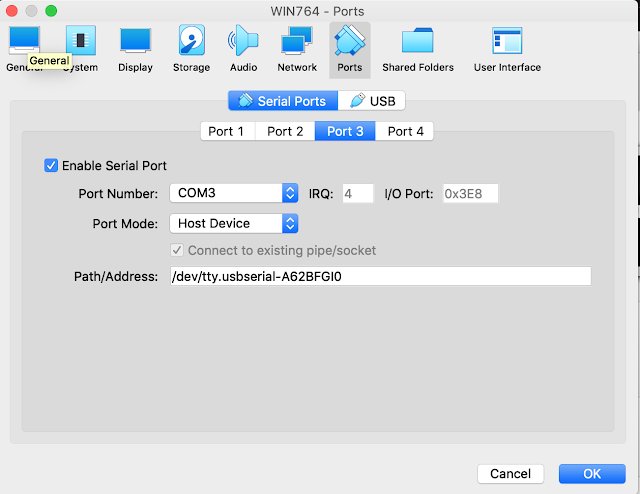
If anybody is using a HOST (meaning your main computer you are using) Mac machine and a Windows VM using VirtualBox, here's how to also get your PORT(COM 3) recognized in the Windows VM. This is important because the cable I ordered needs the drivers for the USB AND the PORT(COM 3) installed. If your Mini VCI cable does not require for this, then please disregard.
On your host mac machine:
1. Plug in the cable to your computer
2. Open terminal
3. Type: ls /dev/tty.*
4. Press enter
5. You should see something like this listed: "/dev/tty.usbserial-A6007dAe". Copy this down.
On your VirtualBox with your cable plugged in:
1. Right click your VM and click "settings"
2. Click "ports" at the top
3. Click "serial ports"
4. Click "port 3"
5. Click the checkbox so that there is a check for "Enable Serial Port"
6. Where it says "Path/Address" paste in what you copied above ^ (/dev/tty.usbserial-A6007dAe)
7. This is the information you should have shown in the picture below
8. Start your VM
9. On the top of your VM, click "devices" -> "usb" -> click enable M-VCI
10. Go to your windows search bar and search and open "Device manager". Or, right click my computer, right click "C drive" and click settings. On the left you will see device manager
11. After opening device manager, click "PORT" and you should see "PORT(COM 3) there or something named similar.
12. In device manager, click USB and you should see your USB enabled there as well.
Hope this helps.
Verified working for Mac 10.14.13 and Windows 7 x64 VM and cable version 1.4.1
2005 LX470


No comments:
Post a Comment