Tuesday, August 14, 2018

Lexus GS300 and CT200 ABS Bleeding with Techstream

Look here: how to flush my brakes on an 06′ GS-300 and a 13′ CT-200, using a Techstream scanner


What is ABS Bleeding:
ABS Bleeding is used to purge air from the hydraulic braking system

What for Toyota ABS Bleeding:
I purchased the Mini VCI Toyota Techstream kit off obdii365.com

Car: a 2006′ GS-300 and a 2013′ CT-200

Time: flushed my brakes on both cars in three hours. The GS took a bit longer (more steps)

Operation system: the software on a 32-Bit windows OS,Using Windows 8.1 on an old Vista machine.

Software install and connection:
Basically install the software on a 32-Bit windows OS,Using Windows 8.1 on an old Vista machine.
Then load the driver, connect to the OBD-2 port the then run the software.
Click connect to Vehicle and follow the screen shots.
It’s part old fashion two man bleed(pump pedal then crack the bleed screw) and part car purging air from the lines electronically.


ABS Bleeding with Techstream:
Utility selection menu: ABS Bleeding
techstream-lexus-abs-bleeding-1
Car: LEXUS GS300 2006
Engine: 3GR-FSE
techstream-lexus-abs-bleeding-2
ABS Bleeding is used to purge air from the hydraulic braking system
Note: when bleeding, ensure that the fluid level does not drop below the indicated minimum line on the resevoir
techstream-lexus-abs-bleeding-3
Increase inline:
(FR/FL/RR/RL)
  • Connect the vinyl bleeder tube to one of the four bleeder plugs
  • Depress the brake pedal several times, then hold the pedal down
  • While holding the pedal down, loosen the bleeder plug to allow brake fluid to drain through the connected tube
  • When fluid stops draining, tighten the bleeder plug, then release the brake pedal

Repeat the process until the air stops coming out.

When finished with all wheels, press Next to proceed
techstream-lexus-abs-bleeding-4
techstream-lexus-abs-bleeding-5
Increase inline:
(FR/RR)
Caution: when bleeding ensure that the fluid level does not drop below the indicated minimum line on the reservoir

Connect the vinyl bleeder tube to the bleeder plug at the right front wheel or the right rear wheel and loosen the bleeder plug

Caution: do not press the brake pedal for any of the remaining inhalation line screens
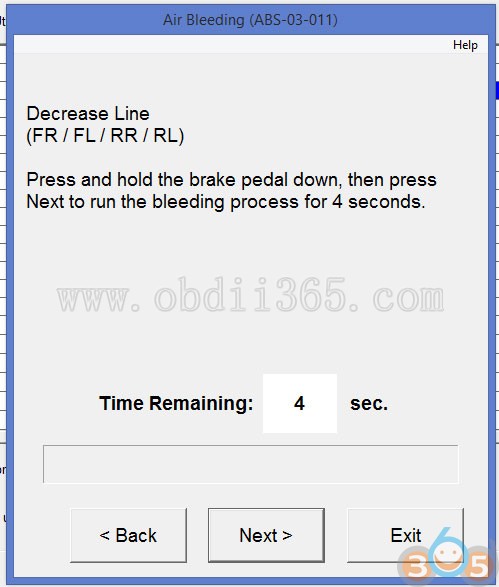
techstream-lexus-abs-bleeding-6
techstream-lexus-abs-bleeding-7
Decrease inline:
(FR/FL/RR/RL)
Caution: ensure that the fluid level does not drop below the indicated minimum line on the reservoir

Connect the vinyl bleeder tube to either one of the bleeder plug and loosen the bleeder plug

Caution: the next step requires the brake pedal to be depressed and held
Do not release the brake pedal while the 4 seconds bleeding process is running

Press and hold the pedal down, then press Next to run the bleeding process for 4 seconds

Tighten the bleeder plug, then release the brake pedal
Please wait for 20 seconds

Repeat this process until all the air in the fluid is completely bled out for FR and RR
Press yes to repeat this process, or press no to exit this process
techstream-lexus-abs-bleeding-8
techstream-lexus-abs-bleeding-9
techstream-lexus-abs-bleeding-10
techstream-lexus-abs-bleeding-11
techstream-lexus-abs-bleeding-12
techstream-lexus-abs-bleeding-13
Increase inline:
(FR/FL/RR/RL)
  • Connect the vinyl bleeder tube to one of the four bleeder plugs
  • Depress the brake pedal several times, then hold the pedal down
  • While holding the pedal down, loosen the bleeder plug to allow brake fluid to drain through the connected tube

Air bleeding is complete!
techstream-lexus-abs-bleeding-14
techstream-lexus-abs-bleeding-15
Job’s done!


Monday, August 13, 2018

How to reset Toyota Airbag SRS Computer Crash Data

How to: reset Toyota Airbag SRS Computer Crash Data. 

Step 1: Introduction
The airbag computer controls the supplemental restraint system in your vehicle, including the airbag sensors, inflators and seat belt pretensioners. It also acts as a black box when you get into a major collision that involved.
reset-toyota-airbag-crash-data-1

Step 2: Airbag Computer's Cannot Be Reused
Well if you decide to rebuild the vehicle and replace the airbags:
reset-toyota-airbag-crash-data-2

You need to replace the SRS computer, since it has a hard code inside that can’t be erased and you’ll be stuck with an airbag light on:
reset-toyota-airbag-crash-data-3
You won’t even be able to access the SRS computer using Toyota techstream software either.
reset-toyota-airbag-crash-data-4
Step 3: Remove the Airbag Computer
The airbag computer is located underneath the dashboard. The bottom half needs to be removed to access it.
Disconnect battery before working on SRS system
reset-toyota-airbag-crash-data-5
reset-toyota-airbag-crash-data-6
reset-toyota-airbag-crash-data-7
reset-toyota-airbag-crash-data-8
reset-toyota-airbag-crash-data-9

Step 4: Disasemble the Airbag Computer
Airbag computer removed:
Open up the computer:
We’re looking for this 8 pin SMD EEPROM chip here that stores the crash data, it says L56R on it
reset-toyota-airbag-crash-data-10
reset-toyota-airbag-crash-data-11
reset-toyota-airbag-crash-data-12
reset-toyota-airbag-crash-data-13
reset-toyota-airbag-crash-data-14
Step 5: Solder and Hookup to an EEPROM Reader
Solder some 32 gauge hookup wire to connect it to the serial
port EEPROM reader (lots of EEPROM reader options, CG100 is best for Japanese car airbag reset)
I built a little EEPROM reader using some resistors and diodes:
reset-toyota-airbag-crash-data-14
reset-toyota-airbag-crash-data-15
reset-toyota-airbag-crash-data-16
Here’s the setup, with the airbag computer EEPROM going to the reader, and then the reader going to the serial port directly on a legacy Pentium 4 computer. You can also purchase USB EEPROM readers
reset-toyota-airbag-crash-data-17
reset-toyota-airbag-crash-data-18

Step 6: Analyze Crash Data
Then I used PonyProg software which is a serial device programmer to read from the EEPROM chip:
reset-toyota-airbag-crash-data-19

Here’s what the crash data looks like:
reset-toyota-airbag-crash-data-20
From a clean, uncrashed Corolla, I dumped the information from its SRS computer and it looks like this:
reset-toyota-airbag-crash-data-21
Comparing the two, you can see a lot of data values have changed.
reset-toyota-airbag-crash-data-22
So now I’m going to replace all the values from the crashed chip with those from the virgin chip and rewrite it to the computer to clear the hard code. Then I’ll replace it into the vehicle

Step 7: Replace the Airbag Computer
So now I’m going to replace all the values from the crashed chip with those from the virgin chip and rewrite it to the computer to clear the hard code. Then I’ll replace it into the vehicle

Step 8: Test to Make Sure It Works
The SRS light should go out within 6 seconds if everything
is functioning normally. I also double checked it with Toyota techstream software and there aren’t any codes or faults found.
reset-toyota-airbag-crash-data-23
And It works!.