Some users reported that they got a problem connecting Toyota Proace 2017+ with Techstream. There is no Proace in the vehicle list. Try different techstream cables (mini vci, mangoose,vxdiag vcx nano toyota) and software versions, all the same.
Here is the clue.
Toyota Proace van is based on a PSA platform. Toyota Proace is a Peugeot Expert and Citroen Jumpy. PSA made Proace for Toyota.
For ProAce project TME has decided the adoption of PSA technical documentation and diagnostic tester.
So you cannot find Proace in Techstream. You will need Diagbox.
Techstream is for all Toyota and Lexus except Supra and ProAce. Supra needs Toyota ISTA* and Proace requires diagbox.
Where to download/get Diagbox for Proace?
Check and download ISTA & Diagbox license for Supra and Proace here.
*Toyota ISTA (which is based on the BMW ISTA) is a seperate software package from Techstream but it does need Techstream installed. It’s specifically for the new Toyota Supras since they’re made by BMW and have different ECUs.
How to configure Vediamo for J2534 Devices (Heremini vci j2534specifically).
If you do not know what anything in the title means, you probably should not try anything on this post.
Notes: 1. We will not be providing a link to download Vediamo or any J2534 products, just explaining how to configure the program settings in order to connect to your car. 2. Vediamo is a programming software that allows you to edit the code within the different onboard computers. This post will only focus on configuring a certain cable – Mini VCI J2534 with the program.
3. You are at your own risk. We are not responsible for the damage.
STEP 1. Get an activated version of Vediamo 4.2. HAS TO BE 4.2 otherwise you will not be able to configure a J2534 device like openport2.0 or MVCI with the program. You can find links to cracked versions on MHHAuto or you can buy a copy on ebay with a keygen for around $10. Not sure how trustworthy ebay is.
We have explained why only Vediamo 4.2 can be used with j2534 and how to configure 4.2 with openport in the previous post.
STEP2. Buy a Mini VCI cable. I got mine on for less than $30. Spend as much or as little as you would like in order to make yourself feel comfortable with attaching it to your benz.
STEP3. Plug in your MVCI and download any necessary drivers. If your computer recognizes it in Device manager as “Serial bus converter” then you do not need to use any install disk that came with the cable. It will be in Device manager – Universal Serial Bus controllers. There should also be another tab in device manager that says “Serial ports” and have your device listed along with “(COM3)”. Make sure it is COM3, otherwise you can right click, go to properties, and change to COM3.
STEP4. Download Autokent MVCI MultiDriver x64 2.0.1. This can be found online (search our blog), you will have to turn off threat/virus protection in order to get it to work. Go through the install process and run the application as admin. The Splash screen should be a picture of a dude holding a gun with the words “Autokent” across the bottom. When prompted, select 2.0.1 from the dropdown menu and install.
STEP5. Now comes the configuring part. Open your Vediamo file location (probably C:->ProgamFilesx86->Vediamo. Then go to Caesar->driver, and right click on “slave”. Go to properties, security tab at the top, edit, add, and then type “everyone” in the box, and select check names on the right side. Then check off the boxes to allow everything. This will allow you to edit the file.
STEP6. Open the “slave” file, scroll down to the “Part J” section. Under the “Device name:” section. Change whatever is inside the quotes to The name of the autokent driver you previously installed. The name should be “XHorse – MVCI Autokent-X64 – 2.0.1”. But, to be sure, you can find the driver name in Registry editor (Windows button, regedit). The location of the driver may be different, but you can find it by going to HKEY_LOCAL_MACHINE -> SOFTWARE and then doing ctrl+f and searching for “Autokent” and finding the next instance. You can then right click on the folder with that title, click rename, then ctrl+c to copy it exactly and paste it into the part J configuration device name in slave.ini. Save the slave file and close.
STEP7. Open Vediamo start center, on Vediamo Server, select update. Uncheck all the boxes except for “Part J” and “Pinmapping”. Select Update. If prompted, select the Autokent MVCI driver from the dialog box as your part J. When working correctly, you should have a box that says “Part xxxxx” with some number as the x’s underneath the Vediamo server box.
STEP8. Select the notepad icon 2 from the left at the tools window on the bottom right of the start center. Select Ecoute options -> format of the variant code string -> change decimal to hex. Everything should be properly set up now. You will need to have the proper .CBF files (look up vediamodata downloads) and from there you can find youtube videos on the possibilities for working on the computer modules on your car.
IMPORTANT NOTE – When connecting to your vehicle, there will be a tab at the top left that shows a connection icon. It will default to saying “KLine1 Communications”. Right click on this, select properties, and then from the dropdown menu, select CANHS. You will have to do this every time otherwise you will not be able to connect to your car properly.
I order a Tactrix Openport 2.0 clone with gold connector from a well-known Chinese online store (obdii365.com). Toyota techstream V15.30.026 downloaded from Rutracker.
We put the drivers from the kit with an adapter, then install techstream.
Select vehicle.
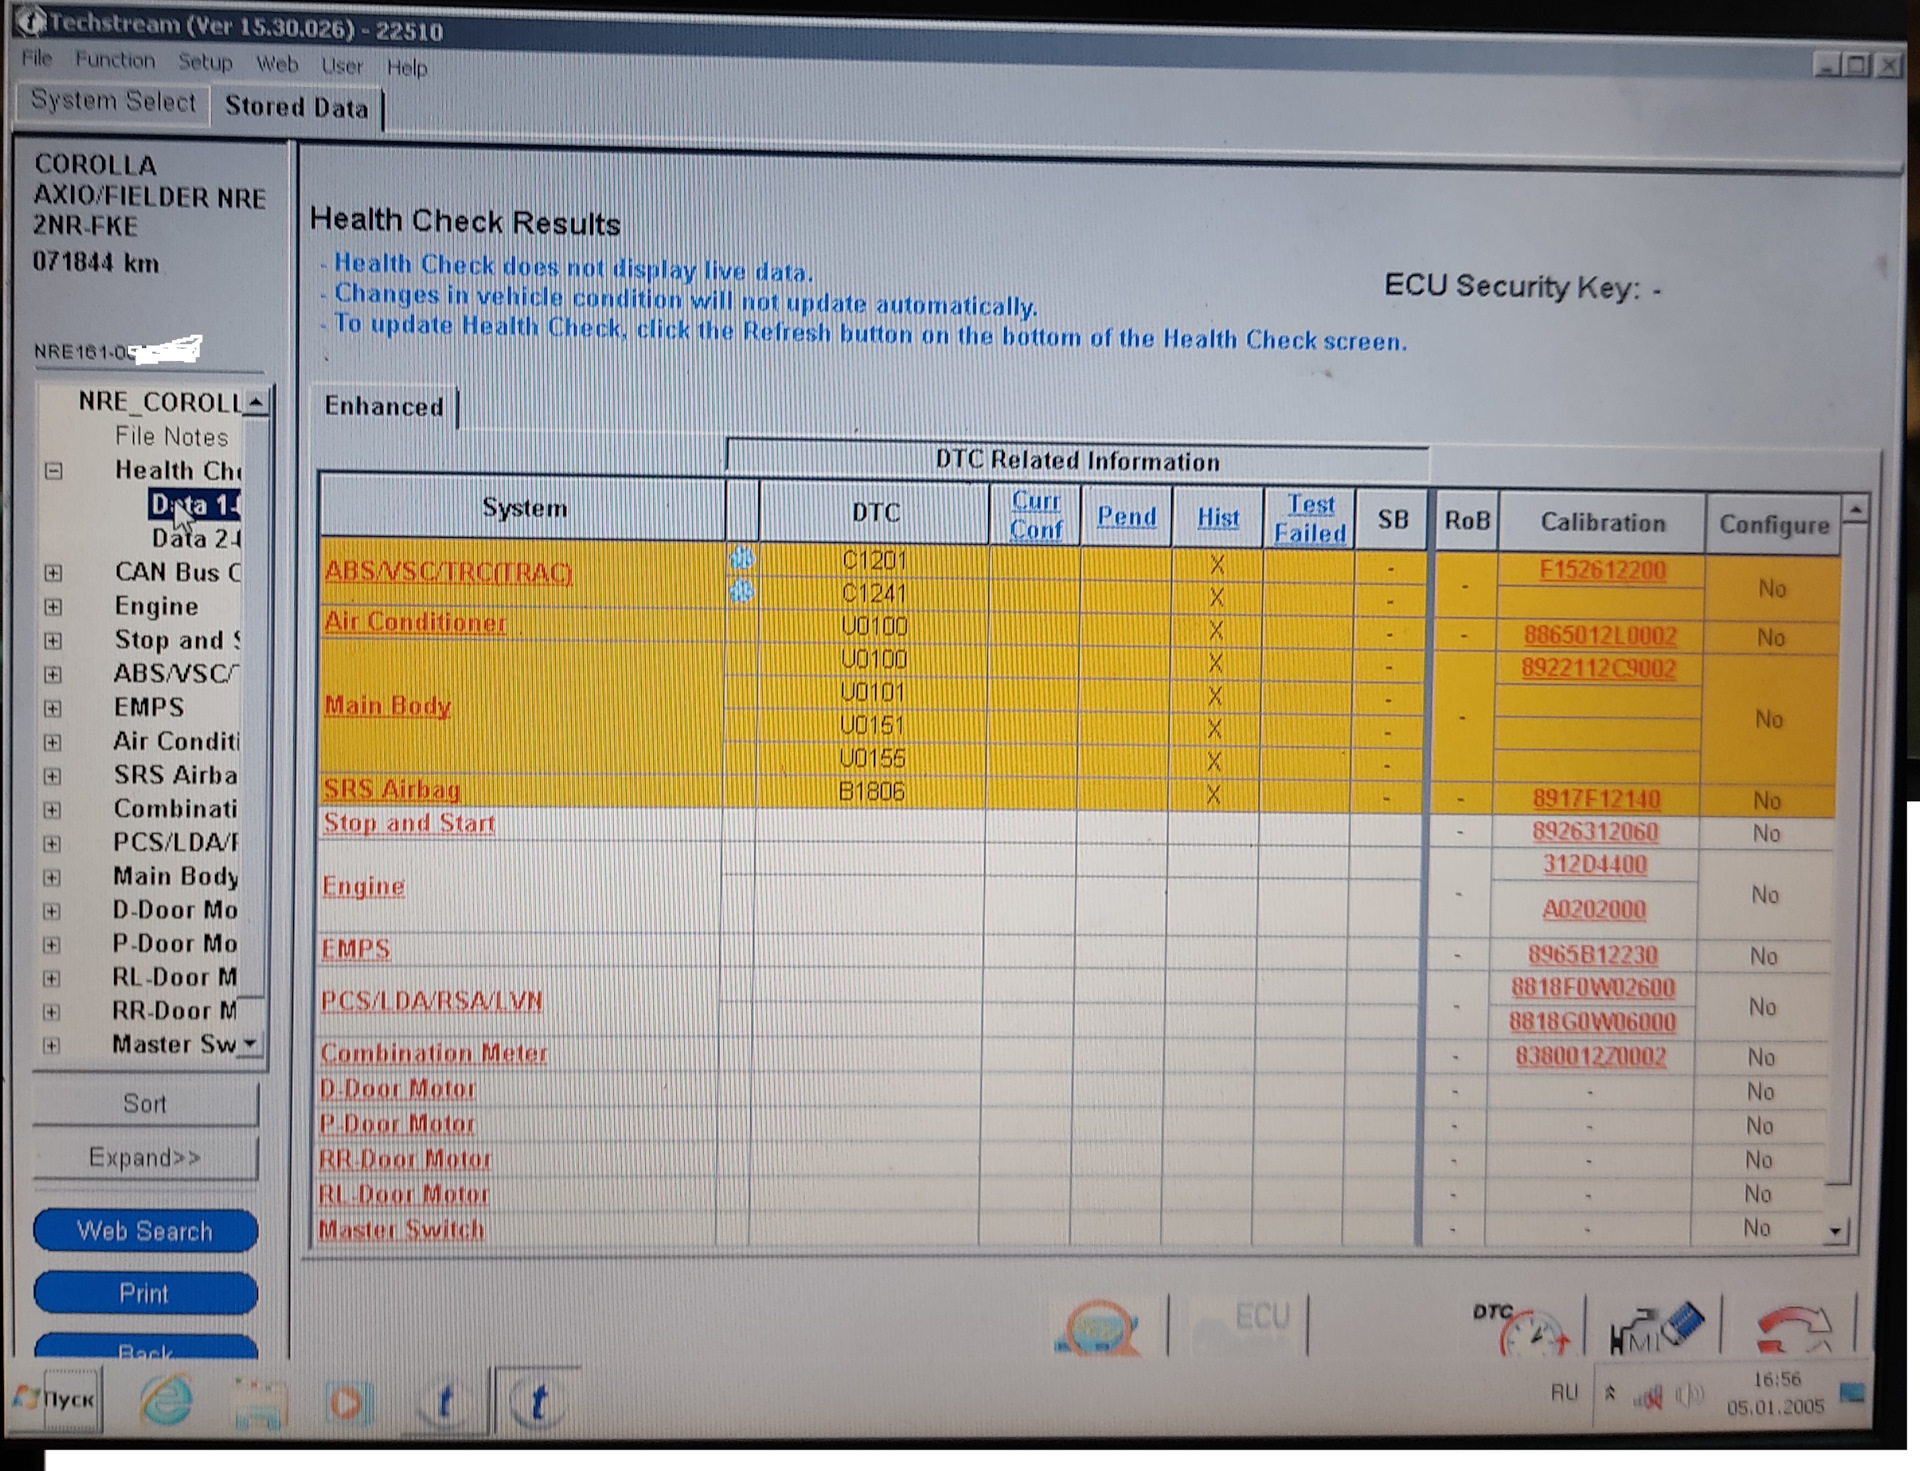
Click Health Check and all modules are scanned for availability and errors
picture from the last scan, since erasing errors, the mileage is about 300 km
with such errors passed the first scan
after returning to the System select tab, it becomes clear which modules are polled and which are not (with *)
then I reveal the content of Customise, here is what we can customize, I set myself a consumption in liters per 100 km, so it’s more familiar
You can see a lot of customize setting options,
disable/enable slide roof open warning
disable/enable key remind sound
disable/enable side seatbelt warning buzzer
disable/enable front passenger side seatbelt warning buzzer
disable/enable tail remin buzzer
disable/enable refrigerant shortage check
disable/enable ODO display time after IG off setting
The key must be new or blank. To register the key you need to prepare a laptop with Techstream installed, a mini VCI cable, an old key and a new key. I registered with Techstream version 16.20.023.
Choosing Roomy
Select the Body module in the list of units
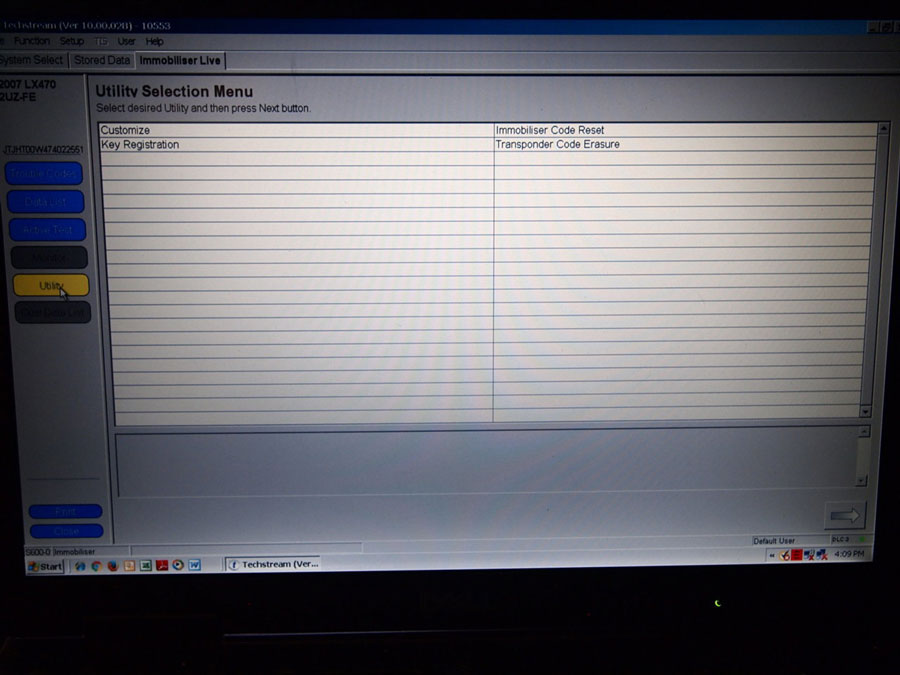
Select Utility on the left
Select Add key registration
The program offers to open one of the car doors and turn off the car.
Then the program will ask you to bring the old key to the start button – if the central lock clicks ok, then the new key. These operations take 30 seconds. – you need to have the keys in direct access. )
Everything, the new key is registered, it remains only to cut a new physical key on a blank.
I stayed up all night thinking about how to make this easy on everyone so ended up coming with an idea of virtual machine.
What is a virtual machine?
A virtual machine is a computer file, typically called an image, that behaves like an actual computer. In other words, creating a computer within a computer. It runs in a window, much like any other program, giving the end user the same experience on a virtual machine as they would have on the host operating system itself.
So I found VMWARE as our software to create the virtual machine and later on that night I was able to find windows XP 32bit and tried installing xp in the vmware and turns out to work great, so with that being said I combined AGAIN all the files including vmware, winxp, techstream and its drivers as well
I installed winxp on vmware turned out very well to an extent that when I connected the mvci cable it auto installed the drivers I did not even have to manually install the drivers not sure how it happen it could have happened because at that time my winxp virtual machine had already access to the internet. And might have downloaded the drivers itself.
Below is the link of the file 1.24gb
as usual please dont forget to block vmware to access the internet using windows firewall block these two files both inbound and outbound rules ProgramFiles(x86)\VMware\VMware Workstation\vmware.exe ProgramFiles(x86)\VMware\VMware Workstation\vmUpdateLauncher.exe
also when winxp is installed on vmware, u can easily drag files from your host computer to winxp (all them techstream files)
Please do check the instruction included in the download and installation will be a breeze I have also included screenshot of vmmachine to make it configured right so that usb devices are detected these pictures will make more sense of what I am trying to say
Although the site was listed version 18. I do not need this program, just for information.
I encountered such a problem that in the disk "MVCI Driver for TOYOTA.msi" the driver was only for 32-bit Windows OS, and I have Windows 10, x64 bit installed on my laptop.
I searched for a driver on the Internet for a long time and came across one, where he left a link to the desired driver and thanks to him for that!
Download "Mini-VCI-Setup.exe" and run, the installation is standard. After installation, this cord appeared in the MMCodingWriter settings and connected to the car without any problems.
I was able to successfully program a combo remote and flip key fob to work on my 2015 Toyota Tacoma. It unlocks, locks, and starts!
Below are the exact steps with links and pictures as best as possible for programming steps.
There are 4 primary steps to getting this to work.
1. Ordering the correct key. 2. Cutting the key. 3. Programming the key. 4. Coding the key.
Let’s begin.
Step 1 – Ordering the correct key.
When it came to ordering the correct key, there were tons and tons of comments and forums throwing out all sorts of suggestions. You can buy remote on ebay:
like this one
New Remote Key GQ43VT20T for 2011-2017 Toyota Tacoma Tundra FLIP key G CHIP
The key features I was looking for was a combination key and fob to lessen down the bulk in my pockets. Flip out was a nice feature but wasn’t necessary. This particular key is pretty good quality and definitely doesn’t feel cheap in any way. The flip out motion is very satisfying as with the button clicks. Critical is that the key is a G chip key as that is what is stamped on the original 2015 Tacoma keys. That code correlates to the ECU transponder which I’ll tackle in the 4th step.
Step 2 – Cutting the key.
For this step, I just went to my local locksmith that also did automotive keys. A regular locksmith could have cut it but sometimes their machines do not have large enough openings to receive a key fob. So to not run into that issue, I went straight to an automotive locksmith. I didn’t get any issues from them in cutting it. He did mention that after market keys tend to be a bit thicker than OEM ones but he was able to get it to cut. I verified that it turned my ignition and worked immediately after.
Step 3 – Programming the key.
This step teaches the remote to control the locks and alarm system on your car. To program my key, I followed the exact steps below and it worked like a charm.
1. Start with the key out of the ignition, drivers door is open all others closed and drivers door is unlocked. 2. Perform these steps within 5 seconds.
A. Insert the key into the ignition(Do NOT Turn) Pull key out. B. Insert the key into the ignition(Do NOT Turn) Pull key out.
3. Perform these steps within 40 seconds.
A. Close then open the drivers door. B. Close then open the drivers door. C. Insert the key into the ignition(Do NOT Turn) Pull key out.
4. Perform these steps within 40 seconds.
A. Close then open the drivers door. B. Close then open the drivers door. C. Insert the key into ignition and leave it in ignition. D. Close the drivers door. E. Turn the ignition to ON (Do NOT Start) then back to OFF. F. Remove the key from the ignition.
5. Within 3 seconds, the power door locks should lock then unlock automatically indicating successful entry into programming mode. Return to step 1 if the locks do not cycle at this point. 6. Perform these steps within 40 seconds.
A. Press the lock and unlock buttons on the remote simultaneously for 1.5 seconds. B. Immediately after letting go of the lock and unlock buttons, Press the lock button by itself and hold for 2 seconds. Within 3 seconds, the door locks should lock and then unlock once indicating successful programming. If the door locks cycle twice, repeat steps A and B in step 6 as the remote was not accepted. C. Repeat steps A and B in step 6 for each new remote.
7. Open drivers door.
That part is pretty straight forward.
Step 4 – Coding the key.
This step matches your car’s ECU immobilizer to the transponder code in your key so that your new key can start the engine. This step gave me a bit of some hiccups but with some further sleuthing I was able to figure it out. You will need to order an OBD2 diagnostic cable and run TIS Techstream on a laptop in order for this last part to work. It’s not as complicated as it seems.
He will provide you with access to a working version of Techstream to use. He sends you a link to download a zip file which seems sketchy but it all worked out for me.
Inside you will find a video file that goes over how to install the program and drivers for the cable. It is critical you follow his steps for Techstream to work.
His steps are as follows (copy and pasted): Step 1: Run “Techstream_Setup.exe” to install it, after installation completed, one shortcut named ‘Techstream’ will appears on desktop, Modify its name to “Techstream Setup”. Step 2: Please install the cable driver for 64 Win, “(64 bit Windows) Mini VCI Driver for TOYOTA.exe”. Step 3: Run “Techstream Setup” to set up ‘Techstream’. Menu “Setup”-“VIM Select”, Select “XHorse-MVCI” for “Interface setup”, click “OK” to continue. (Very important step) Step 4: Run Techstream to diagnose and setup your car. Copy the shortcut “Techstream Patch 64bit” to desktop, always double click the shortcut “Techstream Patch 64bit” to run ‘Techstream’. No registration key is required.
With these four basic steps and the walkthrough video I was able to get the program up and running. (Please note: I did have to pause my computer’s virus protection in order to accomplish step 2 in the list above)
Now to actually code the key within the program. I followed this YouTube video and it worked for the most part.
Troubleshooting: I did run into one issue at this point in the process.
If you get this message, I was able to read on some Lexus forums (they also use Techstream), that this may be cause by the maximum number of allowable coded keys are already coded. To get around this you must run the “Transponder Code Erasure” tool.
This tool does what it says. It erases all keys that your car is currently remembering except for the one you use in the process. It is critical to use one of your currently functioning keys to do this. Once complete, you can then run the “Key Registration” to program your new key fob and any an additional key if you have one.
All done.
After that I had a new working combination fob and key. I’m already super pleased with the smaller key chain in my pocket. In total, the key cost me $39 with shipping, cutting the key was another $5 and ordering the mini vci cable was $32.99 after tax. So for $77, I now have a new fully functioning key and if I want another it’ll only cost me $44 to get a blank fob and to have it cut.
I hope this helps someone else figure out their process. I can only verify that this works on my 2015 Toyota Tacoma TRD Off Road DCSB. I do not own any other model years to try this out on.