Sunday, November 20, 2022

How to Install Mini VCI Techstream on Win10 64bit?

 Many people have trouble loading Mini VCI Toyota Techstream software and driver on Windows 10 64bit system. Obdii365.com here shares some approaches to set it up on Win10 64bit.

If one fails, try another.


Method 1:

The guide below comes from a very helpful Australian forum.

It works.

install mini vci on win10 64bit 1

install mini vci on win10 64bit 2

This guide implies:
1) You know what you’re doing around computers and have the basic necessary skills to create directories, copy files, and import registry keys.
2) You download the file linked below (or have a Mini-VCI CD with the contents roughly matching the included files)

Win64 MVCI Driver for TOYOTA TIS
3) Your Techstream version doesn’t matter as far as I can tell, I’m using V12 (search v12 download on our blog).
4) Windows 10, 64bit (other 64 bit versions, 7, 8, etc should all work too)
5) Tested on Mini-VCI cable J2534 with firmware 1.4.1 (should also work on newer cables too)

Grab the file above, it contains the necessary Mini-VCI 64 bit files. Make sure you copy and paste the entire link and doesn’t parse the URL correctly.
For your own safety, feel free to verify the file is safe from viruses using https://www.virustotal.com/ or any other of the various online virus testing tools.


When you extract the file it will contain the following contents.

install mini vci on win10 64bit 3

All right, let’s get to it.


1) Create some new folders under your C:\Program Files (x86) folder and copy some files there.
C:\Program Files (x86)\XHorse Electronics

then
C:\Program Files (x86)\XHorse Electronics\MVCI Driver for TOYOTA TIS

2) Copy the files FirmwareUpdateTool and MVCI32.dll from the linked ZIP file to the “MVCI Driver for TOYOTA TIS” folder.
It should look like this

install mini vci on win10 64bit 4
I’ve found that every time I’ve installed the VCI drivers from the MSI file, it never created those folders, and put those two files in there. That’s one of the key steps to getting this working.

If those files aren’t in those folders, then Techstream won’t work with 64bit Windows and the Mini VCI cable. In fact, if you’ve done everything else on your 64bit system, check this first, and if those files aren’t in that folder try doing this step and test Techstream, it may just work.


Now, my version of Windows (Win 10 Creators Update – 1709) detected and loaded the drivers for the Mini VCI cable automatically. I’ve found that these drivers don’t always work, so I manually installed the drivers supplied in the ZIP linked above. To install them and enable them on your devices you do the following:

1) Under the ftdibus folder, right click the ftdibus.inf file and click install, and accept any warnings that appear.
2) Under the ftdiport folder, right click the ftdiport.inf file and click install, again accept any warnings that appear.
Get those out of the way before moving onto the next section.
1) Plug in your Mini-VCI cable and wait for windows to recognize it and load the drivers.
2) Open the device manager (Win Key+X then select Device Manager) and open the node “Ports (COM & LPT)” and double click the “USB Serial Port (COM?)” device, and then go to the “Driver” tab.
3) Refer to this image

install mini vci on win10 64bit 5

– if the driver version is 2.6.0.0 then you don’t need to change anything, otherwise go to the next step.

4) If the driver version isn’t 2.6.0.0 then click on the “Update Driver” button.
5) Next click “Browse my computer for driver software”
6) Next click “Let me pick from a list of available drivers on my computer”
7) It should list two drivers,

install mini vci on win10 64bit 6

– the one Windows likes (2.12.28.0) and the one installed manually in step 2 which is 2.6.0.0. Select the driver version 2.6.0.0 and click “Next” wait for the drivers to install then close that window. It should now display the driver version as 2.6.0.0 as installed.
Now, it’s time to do the same with the USB Serial Converter device. So keep that MiniVCI cable plugged in.

1) With the device manager open, expand the “Universal Serial Bus controllers” node.
2) Double click the “USB Serial Converter” device and go to the “Driver” tab.
3) Following the same process in the previous section, check for and change if necessary the driver to version 2.6.0.0. It’s the same process, just replace the device name appropriately.
4) Once both the Port and Converter are on 2.6.0.0 you can now go back to the FirmwareUpdateTool.exe file that you copied and open it, once open click the “Device Info” button and it should say it’s connected, and return the firmware version of the cable.

install mini vci on win10 64bit 7

That’s the Mini VCI cable taken care of.
—–

Now, you need to import the mvci-x64.reg file included in the ZIP. Without this imported, Techstream won’t know how to load the necessary files for the MiniVCI cable, namely the MVCI32.dll done in the first section. So simply double click it, and import it when prompted. It’s that easy.
—–
It’s implied you already have Techstream installed and licensed, this guide won’t cover that step (there’s tons of guides out there that cover it if you need it). You may also need the IT3 ini files in the zip for your Techstream. They go in the ENV folder inside the Techstream install folder.
Now, you should be safe to open Techstream and verify operation. So with the MiniVCI cable still plugged in, open Techstream.
1) Go to “Setup” then “VIM Select”. It should open with the Interface setup of “XHorse – MVCI”
2) Refer to this image at the bottom, with the arrow

install mini vci on win10 64bit 8

Techstream should show “VIM – Xhorse – MVCI J2534 DLL v1.4.7” (dll version may differ if you used your own files) the key is, if you get this far and it’s not just saying “VIM – Xhorse – MVCI” (which happens when you open Techstream without the MiniVCI cable plugged in) then you should be right to connect to the car. So turn on the ignition and connect.

3) If it has all gone well, then you should be presented with a progress window and if you get this far then Techstream is talking to the MiniVCI cable on your 64bit Windows.

install mini vci on win10 64bit 9

That’s it all done, have fun.


Method 2:

Get the correct driver from FTDI website. The document is to get Windows 10 64-bit computer to recognize the Mini VCI J2534 with 1.4.1 firmware (FT232RQ chip). This is not a comprehensive guide but rather should be used as a supplement to the plethora of driver + Techstream instructions available online. Hopefully, this will help others by reducing the number of hours it takes to get this damn thing to work.

The Mini VCI J2534 (aka MVCI) device is a OBDII to USB “dongle” used to connect laptops to Toyota/Lexus vehicles, often for the purpose of using Techstream. This device utilizes a USB to serial signal converter produced by FTDI (ftdichip.com). The chip is essentially a translator so that the computer can communicate with the vehicle, and vice versa. The MVCI I bought had the 1.4.1 firmware (not the 2.0.4) which has the FTDI chip part# FT232RQ.

1) I first started with a freshly reformatted burner laptop with 64bit Windows 10. Never connected to the internet, disabled auto update of drivers using three methods (1. Device installation settings – > “No, let me choose”, 2. gpedit.msc, and 3.regedit), and uninstalled the preinstalled/bloat anti virus.
2) Connected the MVCI to the laptop and saw an unknown device in the Device Manager. Note that only one unknown device was listed, NOT TWO! Many guides state that there should be two: one unknown/warning within the “Universal Serial Bus controllers” and one in the “Ports (COM & LPT)”. I was beginning to think that my dongle was somehow damaged since I only saw one.
3) The two commonly suggested methods for installing the driver for the FTDI chip is to either extract the driver files into C:\Program Files (x86)\XHorse Electronics\MVCI Driver for TOYOTA TIS or to use the AutoKent program, followed by the registry edit program. I did both extract and AutoKent, and ran the registry edit (mvci-x64.reg).
4) Updated the driver of the unknown device by Device Manager -> Right click -> Update Driver -> Browse my computer for drivers -> Let me pick from a list of available drivers on my computer -> Have Disk -> Browse -> [now navigate to XHorse or Autokent folder]. Neither worked as it now showed a yellow exclamation mark.
5) Download/transfer onto the laptop the 2.12.36.4 driver from (ftdichip.com/drivers/d2xx-drivers/) which is the most recent driver for 64 bit Windows. As soon as I dropped the driver onto the burner laptop, the Device Manager picked it up and auto updated, even though it shouldn’t have. The USB Serial Converter no longer has the yellow exclamation mark and the properties of the Converter shows a Driver Version of 2.12.36.4. The red LED of the dongle is now permanently on! Constant red led = computer understands how to use the dongle.
6) Install techstream.

Probably the two important steps were to 1) disable auto update of drivers and/or disconnect from internet and 2) download the latest FT232RQ driver. I was able to get this same cable to work on a 32bit Win7 machine months ago, but the cable would spontaneously work then not. I wonder if it was because the driver was automatically being replaced.

Anyways, all of that work so I can program a new key. The analog on-off (x5), open-close (x6) method to add immobilizers only works if there are 3 or less keys registered.


Keep updating…

Monday, October 17, 2022

Mini VCI Firmware V1.4.1 vs V2.0.4

 Which firmware version of Toyota Techstream cable is better? Mini VCI V1.4.1 or V2.0.4?


More info about mini vci j2534 with firmware 1.4.1 & 2.0.4:

The clone cables used 1.4.1 or 1.4.6 (latest) firmware.

mini vci firmware 1.4.1

The “real” cables use 2.0.1 or 2.0.4 (latest).

mini vci 2.0.4

They are all clone Techstream cables of course but the good fakes use the same firmware as the real Xhorse cable. The 2.0.4.


Back Story:
1) Original TechStream cable/machine costs $5000+.
2) Drew Technologies created the Mongoose MFC cable as an alternative to TechStream. It’s legit and supported for TechStream Lite but the cable costs $500.
3) XHorse is a clone of Mongoose. Costs about $100. This is “legit”. 100% works with all modern Toyotas.
4) Chinese clone mini vci of XHorse. This is what most people are buying. The good fakes use the same firmware as XHorse. These ones will work just like the XHorse except you get no L-line support for flashing ECUs. This is fine for most people.

Firmware 2.0.4 supports all the diagnostic communication protocols needed for Toyota (since 1996). Better performance and compability ( Activate Test , Customize function, ECU Reprogramming etc.) !

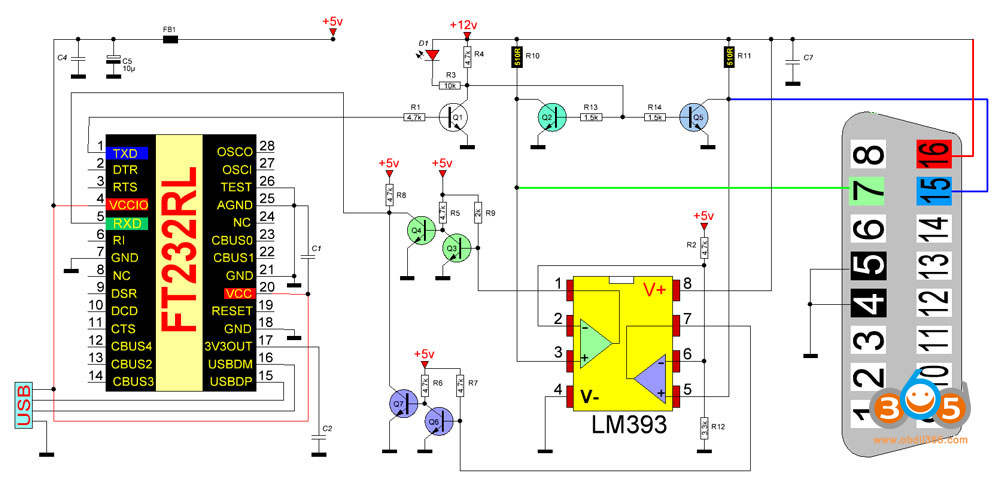
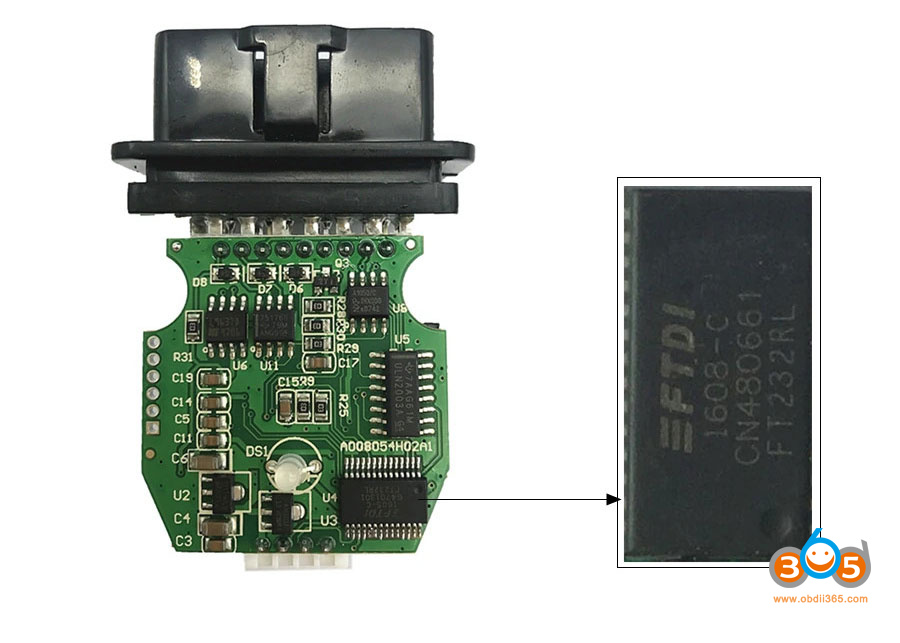
The latest 1.4.1 firmware interfaces have both CAN chip (xx1050) and K-Line chip (fake discontinued si9241a = LM393 in a different circuit), so they may full support these 2 protocols for Toyotas since 1996+. Only missing VPW chip (and si9241a for L-Line).

They will not work on the 2011 Prius as some on PriusChat have said.

Fake 9241A chip

Fake 9241A chip

Real 9421A chip

Real 9421A chip

LM393 instead of 9241a

LM393 instead of 9241a in a circuit for vag com kkl 409.1


Mini vci 2.0.4 firmware PCB

Mini vci 2.0.4 firmware PCB 1

Mini vci 2.0.4 firmware PCB 2


Mini VCI 1.4.1 firmware PCB

Mini VCI 1.4.1 firmware PCB 1

Mini VCI 1.4.1 firmware PCB 2


2.0.4 cable is now only available in ali or ebay, twice as expensive than 1.4.1 cable.  If you need to troubleshoot K-line Toyota/Lexus, 1.4.1 is fine. 1.4.1 is tested working with the latest Toyota.

MINI VCI Techstream V17 Tested Working on 2022 Tundra


There is no reason to try to update firmware. Interfaces with 1.41 will be bricked if you try to update firmware. There is not enough space inside the chip.

If bricked your mini vci j2534 cable, follow the DIY solution to fix it.

How to Fix Bricked Mini VCI J2534?

Read also:

http://blog.obdii365.com/2022/06/24/vxdiag-mini-vci-1-4-1-or-2-0-1-for-old-lexus-sc/

Wednesday, October 12, 2022

How to Repair Bricked Chinese Mini VCI?

 Here is the customer DIY solution for those who bricked their mini vci j2534 interface after using Firmware update tool.

mini vci j2534 cable

SOLUTION:
STEP 1: Download the hex file attached.
STEP 2: Download Flash Magic (used version 13.20)
STEP 3: Connect the mvci device to an USB port
STEP 4: Open Flash Magic, select LPC2119 (LPC2000) in the field device
STEP 5: Select the serial port: i.e serial port COM3, try to remove the mvci device and plug it again to see if the FlashMagin detects the COM port automatically (maybe is better to remove all others USB devices during the process (my case))
STEP 6: Baud-rate: I selected 38400, but maybe other (lower) can provide a secure flashing.
STEP 7: In the Firmware panel update the .hex file.
STEP 8: Press the giant button START. The flashing should start, it takes a while (2 min aprox. for me, I read others could take 20 min)
STEP 9: When Flash Magic get out of the busy state, the process is finished, close the software and remove the device of USB port.

To confirm that it was restored to 1.4.1 version open the Firmware Update tools and check the firmware version.

Free download mvci-MVCI006000001


  1. Be sure your device is connected and recognized by the computer. Try connect to your computer with driver FDTI FT232 (be sure your system is 32bits or 64bits). (MVCI J2534 china clone use this driver https://www.ftdichip.com/Drivers/D2XX.htm)
  2. Once connected, easily will be recognized by Techstream in Windows 32bits. For 64bits, you need search online
  3. Save your current firmware with FlashMagic (Read & Save) before updating
  4. Update Hex firmware 1.4.1 (attached compressed file, unzip the entire folder with 7zip or whatever unzip program)

NOTE:

FlashMagic access to LPC2119FBD64 microcontroller from MVCI J2534 selecting LPC2119 (LPC2000) in the field device. If FlashMagic don’t read your device, probably you have to open it to identifier the microcontroller type.
If the MVCI clone is built on a fake FT232R chip, it is possible the installation of fresh drivers has reset its EEPROM.
Years ago FTDI released a driver (2.11.0 and 2.12.0) that bricks chips that it believes to be counterfeit. What it did was to set the PID (Product ID) to 0000 instead of 6001 which renders the chip unusable as Windows cannot find a driver for it.
There are many post how to identify fake FT232R chip and how to fix it.

Once you are sure your device have PID 0000, one of the solutions is flash it with the attached archive that contains an ept file using “FTDI Mprog 3.5“

ft232r_eeprom


Feedback:
1). The drivers are ok.
I have 2 other white/transparent MVCI devices:
– cheap one  firmware v1.4.1
– full chip one firmware v2.0.4

Both work fine without any problems.
I even have the impression that the cheap one works better then the Full Chip MVCI.

2).

This worked. I was able to flash the .hex file using FlashMagic, and the dongle connects to the truck. I had previously flashed to 1.4.8, and then back to 1.4.1, but using the “official” firmware, not the clone firmware, while trying to use this on 64bit Windows. After flashing back to your 1.4.1 image, it works great. I’ll stick with my 32 bit Windows 7 image for now.
3).

I tried to recover my dead Chinese MVCI cable with mvci-MVCI006000001.hex file.
In my case, I need put LPC2119 to ISP mode before flash with the file.

To this, I figured out just short holes on P2 of the PCB when connecting USB.
  

fix bricked mini vci j2534 cable 1

LPC2119 entering to ISP mode if successfully, LED keeps green. (fig2)

fix bricked mini vci j2534 cable 2

I think it is successfully flashed my dead MVCI cable with the hex file.

fix bricked mini vci j2534 cable 3


In a nutshell, there is no reason to try to update firmware. Interfaces with 1.41 will be bricked if you try to update firmware.

Monday, September 26, 2022

Mini VCI Techstream Add Toyota Tundra 2016 New Key

How to use Mini VCI Toyota Techstream V12 software to program a new key for Toyota Tundra 2016.


Procedures:

Connect MINI VCI cable to Toyota Tundra obd port,then run Techstream software

And click “Connect to Vehicle” button at right side menu

Confirm the vehicle information and press Next

Mini VCI Techstream Add Toyota Tundra 2016 New Key 1


After then click “Immobiliser”

Mini VCI Techstream Add Toyota Tundra 2016 New Key 2


Click “Utility”

Mini VCI Techstream Add Toyota Tundra 2016 New Key 3


Then select desired utility “Key Registration”option and press Next button.

Mini VCI Techstream Add Toyota Tundra 2016 New Key 4

This function is used to register immobiliser keys, press Next to proceed.

Mini VCI Techstream Add Toyota Tundra 2016 New Key 5

Once you get here just follow the instructions and you gonna program the key.


Monday, August 29, 2022

Toyota Techstream V17.20.013 with Patch Free Download

 Latest version Toyota Techstream V17.20.013- 08.2022 + loader was tested working fine. The software can be downloaded free here.


Version: Techstream V17.20.013

Release Date: 08/2022

Region: All regions
Type: Diagnostic tool Software
OS: WinXP, Vista, Windows7, WIN8, WIN10, Win11 32bit & 64bit

Vehicle coverage: 1996-2022 Toyota Lexus

Compatible devices: VXDIAG VCX NANO Toyota (don’t need MVCI driver), Mongoose pro, Openport 2.0, SM2 Pro, Mini VCI J2534 Item #SV46-D, SV46-D1

Free Download Toyota Techstream V17.20.013

Free download Techstream 17.20.013 software incl. loader

Techstream Setup v17.20.013.exe  & patch

https://mega.nz/file/DFRghLRb#5xjGIWjk0JdZzyPPpPrzgNce52luewTBaUhM6cgiwPo


Include:

  • Techstream v17.20.013 and Loader (08.2022).exe
  • Patch 32bit & 64bit
  • Drivers.rar (MINI VCI driver 32bit & 64bit, Mongoose pro MFC driver 32 bit & 64bit, VXDIAG driver)


Language: 

Japan: Japanese, English

North America: English, French, Spanish

Europe: English, German, French, Spanish, Italian, Chinese, Turkish, Russian

Other regions: English, German, French, Spanish, Italian, Chinese, Turkish, Russian


How to install:

1. Install the Program Toyota Techstream 17.20.013
2. Copy TS Loader into the installation directory — Toyota Diagnostics\Techstream\bin\
3. Create a link from the TS_Loader on the desktop you like
4. Start TS_Loader
5. Have Fun

Free Download Toyota Techstream V17.20.013 with Patch 1

Free Download Toyota Techstream V17.20.013 with Patch 2

Free Download Toyota Techstream V17.20.013 with Patch 3

Tuesday, August 23, 2022

Mini VCI and Techstream Review on Lexus SC430 2007

 Which cable and techstream version for Lexus SC430? Check the user test report and review below.


My mini vci v1.4.1 cable off obdii365.com works with the following
2002 SC430
2007 SC430
2004 Tacoma
2010 Camry


There are several versions of the cable floating around, but there are two major distinctions:

V1.4: Most common. Cost: $20-50

V2.0: Difficult to find. Many devices that claim to be V2.0 are actually just scams. Cost: $50-$100


Let me start by saying cable v2.0.4 only read the VIN data of my 2007 SC430 but wouldn’t change any settings or command the seat ECU to recline the passenger seat back. I think the cable or chip has issues.

Cable v1.4.1 worked 100% as usual.

I have an old Gateway laptop running WinXP 32bit.
I am running Techstream v15.00.016 but I first loaded v12.10.019.  It seems to function the same for my cars.

Here is the link to the 5 min install
http://blog.obdii365.com/2019/11/04/download-techstream-v12-vmware-for-vxdiag-toyota/
if you want to download TechStream directly to your laptop, click link below
You will probably need WinXP or Win7 32 bit to do it this way.
you may need to download a free copy of winrar to unzip or unpack the v12 files.

http://blog.obdii365.com/2017/05/09/toyota-techstreamv12-10-019-free-download/

here are some pics of a couple of operations

Mini VCI and Techstream Review on Lexus SC430 2007 1

A lot of customized functions

Mini VCI and Techstream Review on Lexus SC430 2007 2

Mini VCI and Techstream Review on Lexus SC430 2007 3

I selected the engine ECU button…then data list.  Those are the live engine data screens. I have noticed some Toyota and Lexus models separate transmission live and engine live data access, while others combine engine/transmission live data.

Mini VCI and Techstream Review on Lexus SC430 2007 4

Mini VCI and Techstream Review on Lexus SC430 2007 5

Mini VCI and Techstream Review on Lexus SC430 2007 6

Mini VCI and Techstream Review on Lexus SC430 2007 7

command the seat ECU to recline the passenger seat back

Mini VCI and Techstream Review on Lexus SC430 2007 8

Mini VCI and Techstream Review on Lexus SC430 2007 9

Mini VCI and Techstream Review on Lexus SC430 2007 10

Mini VCI and Techstream Review on Lexus SC430 2007 11

Mini VCI and Techstream Review on Lexus SC430 2007 12

Allows to register TPMS

Mini VCI and Techstream Review on Lexus SC430 2007 13

Mini VCI and Techstream Review on Lexus SC430 2007 14

It also has a change VIN function.

That could be handy if you buy a used ECU and need to match it to your car.  not sure cause i didn’t get a chance to test it.

Mini VCI and Techstream Review on Lexus SC430 2007 15

Personal experience: this mini vci 1.4.1 cable works perfectly. Good enough for reading/clearing codes and diagnostics.