Monday, April 20, 2020

Techstream Software Version & Required Adapter

Best I can tell the only XHorse interface firmware version that I used that worked with it is mini vci cable 2.0.4, these are cloned versions of Techstream and the XHorse cable interface, the real Toyota Techstream costs nearly $2000.

Using Techstream 12.30.017 (newest: v14.20.019) with the cheap Mini VCI Cable J25345 over here (Firmware 1.4.1) on a HP-Zbook with Windows 10-64bits prof.
Installed it using the 64bit for Windows 7/8 instructions previously mentioned and on
blog.obdii365.com
mini-vci-16-pin-cable

You can actually check all stages of the installation without connecting to the car:
First make sure to follow the unpacking/copying instructions in the 64-bit installation instructions before plugging in the cable in the USB port. When installed correctly you should be able to run the firmware update tool to check the firmware. Just do NOT update, only use it to see if the cable is recognized and reports back its firmware version + “connected” status.
If this is OK then at least your interface should be installed correctly, showing a red LED in the process.
Then install Techstream and apply the registry fixes (either manually or by the downloadable registry mod file), also previously mentioned. You can also manually point the original Techstream interface entries in the registry (same location) to the same Xhorse files just to be sure. These settings point Techstream to the correct location of the XHorse driver used for the MVCI Cable.
Also do not forget the TISFUNCTION=0 modification in the IT3System.ini file. If you get “unable to connect to MCI” when connecting to a vehicle most likely these registry settings are not fully correct.
When you now start Techstream with the TSloader make sure the correct interface is selectable (not grayed out) and selected, otherwise re-check the previous setting. Then just connect to vehicle (without actually being connected, just have the MVCI cable connected to the USB port) and you should get no errors but Techstream should eventually (after time out…) come up with a window where you can manually select your vehicle code etc etc.
When I then connected to my RAV4 it connected nicely and I could readout my TPMS sensor ID’s which was my main objective. The interface is flashing green during communication with the vehicle.
So be assured: Techstream can work on a Windows-10 64bit Prof. laptop without the need of a virtual machine.

Wednesday, March 4, 2020

Techstream Fixed 2007 Lexus LS 460 VSC Lights on

Car model and year: 2007 LS 460 Base model

Symptom: I have had the front two wheel hubs replaced , however I have the VSC, ABS and AFS Off lights on. I used BlueDriver ODD II Bluetooth scanner to get trouble code C1236 LEXUS – Foreign Object Attached On Tip Of Left Front Sensor. When I clear the code it comes right back when I drive the car.
Code is coming back because the problem is still not solved.

What to do next?
Thinking about also ordering a Mini VCI Toyota Techstream cable so I can see more detailed facts about the code.

Update:
Last night I did not have time to jack up the car and put a multimeter to the wire harness connector at the ABS sensor, so I did some other troubleshooting.
I opened the fuse box on the passenger side and checked all the fuses and they all seemed in tact none were blown.
Then I tried looking at the ABS ECU connectors but could not fully pull it and disconnect all the connectors and clean it, so I decided to pull the grey connector that sits on top of it. Once I did that I started the car to see what I got and I got the message of “Break Malfunction pull over immediately…” you know the message.
So that tells me that that ECU is working as it should, I shut the car off , plugged the connector back and started the car again and that message went away.

As noted before I plan on checking the voltage to the connector for the correct reading to eliminate that, if it reads correct then it must be the sensor itself and I will have to pay to get the hub taken off and replaced. (my garage tool arsenal is not that vast!).

I ordered the part off of RockAuto so I want to exhaust all the possibilities.The shop just installed the part, I have a re-order/warranty replacement on standby from RockAuto but will still have to pay for labor.

This is where Toyota TIS Techstream would really help you out.

Sunday, December 29, 2019

Mini vci or Mongoose Techstream Cable to Register Lexus TPMS?

I was searching for a preferred tool for dealing with my TPMS nonsense. Dumbe tire guy broke one while putting on my new tires and are too dumb or do not have the right tool (or both) to unlock the ECU and register the new TPMS module.
I would like to purchase a tool to takes care of this issue as i see it happening again and again.
What is the preferred tool to buy that will do it all (unlock ECU) and do what needs to be done to support our TPMS requirements?

After search on lexus club forum, i find some clues. Here are some real user experience.
Mini VCI J2534 cable
1)
Download techstream and invest in a mini vci OBD-II cable. Best $20 buck I’ve spent and I was able to reprogram the ECU with the new TPMS reg code plus more. You will also need a TPMS scanner to pull the reg code off each sensor, but that is if you already have the sensor inside the tire.
I bought the cable here https://www.obdii365.com/wholesale/mini-vci-for-toyota-with-toyota-tis.html
It works on my 2006 GS. I haven’t tried on my 2013.

2)
I have the exact same mini vci cable and I cannot get it to program my TPMS sensor. I read it could be due to the dongle being on the older firmware not the 2.0.4 firmware and not supporting new protocols. Worked just fine on my 3GS but not my 4GS to program the TPMS. I could read all the data from the car but cannot write any new values.
That’s the exact problem I get and from my research it seems like you need a firmware 2.0.4 cable in order to resolve this problem with newer cars. You cannot unfortunately update the existing cable to that firmware because the newer 2.0.4 cable has additional security hardware in there as well.

3)
I have that exact same cable. You cannot write new TPMS sensor values with that cable on the 4th gen Lexus GS. Worked just fine for me on my 3rd Gen GS. 4th Gen GS requires a different newer cable with additional security hardware on it.


The mangoose JLR/Toyota/Volvo 3-in-1 vci cable 
I read that as well but it seems like firmware 2.0.4 is a hit or miss. I have one more cable on hand. It’s a 3-in-1 Toyota/Volvo/JLR, luckily, I have 2 of the 3 vehicles listed.
http://www.obdii365.com/wholesale/mangoose-jlr-volvo-toyota-scanner.html
mangoose-jlr-vci-cable
I purchase the Autel Maxitpms ts201 scanner. It’s really basic but it tells you the ID code, PSI, temp and battery condition. The best $50, on sale price, spent. I’m going to play with this on my other GS this weekend since Lexus said one of the batteries is low. I want to see how accurate the battery condition is.
autel-tpms-ts201-1

autel-tpms-ts201-2
Good news. The Mongoose Toyota/JLR OBDII will write to the ECU. I can only say this for the 2013 model. I don’t have a later model I could try on. Well shoot. I have my 2019 UX as well.
mangoose-toyota-techstream-tpms-1
mangoose-toyota-techstream-tpms-2

mangoose-toyota-techstream-tpms-3
I tried a couple times with my new set and old set. I reprogram the old set back in.
mangoose-toyota-techstream-tpms-4 

Test result:
Got mine in today and works like a charm.  MIni VCI cable failed to register TPMS on 4th gen GS, but the mongoose cable did it no problem.

Monday, November 25, 2019

How to use GM MDI with Toyota Techstream?

Here’s the tutorial on how to use GM MDI (Multiple Diagnostic Interface) with Toyota Techstream software. This is not necessary because the MINI VCI passthru cable is very cheap for techstream.  The guide is for those who are interested in finding a good mvci alternative.
gm-mdi-toyota-techstream-1
Disclaimer: You are at your risk.  We are not hold the responsibility for the damage.

Instruction:
Techstream has only 2 default pass-thru device selection options: TIS Techstream VIM and Xhorse MVCI
So first step we need to add MDI to the VIM selection.
gm-mdi-toyota-techstream-2
gm-mdi-toyota-techstream-3
Connect GM MDI interface with vehicle (here we use Windows 7 machine) via USB cable
MDI supports WiFi connection as well, but obviously we need to use USB connection here
gm-mdi-toyota-techstream-4

gm-mdi-toyota-techstream-5
Go to MDI software folder and find MDI Manager driver
Install MDI Manager driver setup
gm-mdi-toyota-techstream-6
gm-mdi-toyota-techstream-7
Install the GM MDI Software InstallShield Wizard
gm-mdi-toyota-techstream-8
Configure USB
Power on the MDI, wait for the “beep”. Ten connect it to the PC with the USB  cable(already connected it).
Press the Configure button when ready. Configuration may take several minutes.
gm-mdi-toyota-techstream-9
Finish installing MDI driver.
gm-mdi-toyota-techstream-10
Open GM MDI Manager on desktop
MDI is not yet connected
gm-mdi-toyota-techstream-11
Open Techstream software (here use Ver. 13)
gm-mdi-toyota-techstream-12
Now the MDI passthru is added to the VIM selection
Select MDI interface and press OK
gm-mdi-toyota-techstream-13
Accept Windows Security Private networks and allow access
gm-mdi-toyota-techstream-14
MDI not connected (require configuration)
gm-mdi-toyota-techstream-15
Open GM MDI Manager on desktop again
System prompts no MDIs detected
It require to recover MDI, press Recover button
gm-mdi-toyota-techstream-16
If it warns MDI software is out of date. Run Start Update
Do not unplug the MDI from the PC or remove power from the MDI during the update process.
gm-mdi-toyota-techstream-17
The MDI will automatically restart when update completed
gm-mdi-toyota-techstream-18
Now the MDI interface is connected
gm-mdi-toyota-techstream-19
Run Techstream again
Choose MDI interface
gm-mdi-toyota-techstream-20
Initialize USB communication and connecting
Check the indicators on MDI adapter
Communication is built
gm-mdi-toyota-techstream-21
Select vehicle model and start diagnose Toyota.
Done.


See also:

Tuesday, November 12, 2019

Program Smart Keys to Lexus, Toyota and Scion by Techstream

This is about how to program a new smart key & remote fob for Toyota, Lexus, and Scion.
techstream-toyota-smart-key-1
Background:
A few years ago I bought my used 2008 Toyota Highlander Limited and it came with just one “Smart Key” to start the engine. Initially, I wanted to get a second key for a backup, but few hundred dollars price tag from the dealer made me hold off on that idea. A few months later, was told that it is possible to program any Toyota, Scion or Lexus smart key using a special cable and software, so I started my online search. After some struggling and few failed attempts, I finally figured out the way to do it. It still cost me quite a lot of $$$, but nevertheless, I still saved about $100 compared to the dealer’s price.
Disclosures
The following smart key programming instructions are not guaranteed to work. Performing this procedure can potentially damage your vehicle, void your vehicle warranty, and cause expensive repair costs. Do it at your own risk.

What you will need + How to program keys:
  1. Windows-based PC laptop computer
  2. Diagnostic software Techstream and cable MINI VCI (USB to OBD2)
  3. New Toyota, Lexus or Scion Smart Key fob with unlocked smart chip transmitter
    (these are eBay affiliated links)
  4. TechStream “Professional” subscription (https://techinfo.snapon.com/TIS/Register.aspx).
Step 1
In order to program Toyota, Lexus or Scion smart key, you will need to get the Techstream software and MINI-VCI cable. You will need to install the software and the driver on your Windows XP, 7, 8 or 10 computer or tablet. Installation instructions are usually provided with the purchase of the cable.
Step 2
Next, you’ll need to purchase a new original OEM unlocked Smart Key fob. You can also buy a used Smart Key if you want to save money, just make sure you are buying unlocked one. Otherwise, you will have to find someone to unlock it for you, like your local Locksmith or hardware store (though very often they will refuse to do that and offer to buy their keys instead). Search for smart keys compatible with specific make, year, and model of your Toyota, Lexus or Scion.
Step 3
Install cable drivers and diagnostic software on Windows PC based computer. Installation instructions are usually included with the purchase of software and the cable.
Step 4
Programming Instructions:
  • Connect your computer to OBD2 port under the dashboard of your car using the included cable
techstream-toyota-smart-key-2
  • Launch TechStream software and click on “Connect to Vehicle”
  • Select your car make, model, year, engine
  • Choose “With Smart Key” option
  • *If your car doesn’t have smart keyfob, choose “Without SmartKey”. Programming instructions will be different.
  • Select “Smart Key” system
  • Click on “Utility” button
  • Select “Smart Code Registration”
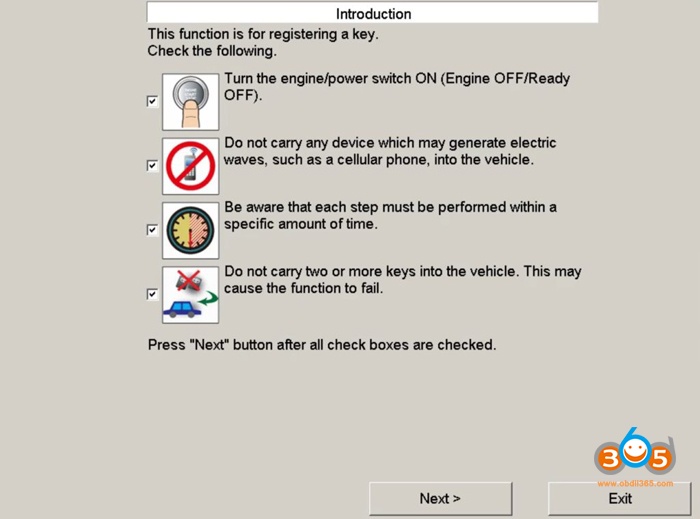
techstream-toyota-smart-key-3
  • Press the Start button in your car once to turn the engine/power ON
  • Remove any devices that may cause electromagnetic interference, such as cell phones
  • Be aware that you will need to perform each step within the specified amount of time
  • Only carry one smart key into the vehicle at a time
  • Check four checkboxes and click “Next”
techstream-toyota-smart-key-4
Notice the number of available spaces for a new key. If the number of available spaces is 0, then you need to go back to “Smart Code Reset” utility first
techstream-toyota-smart-key-5
Place already registered smart key into the car, and remove the new unregistered smart key from the car, and click “Next”
(I rolled down the window and placed the unregistered key on the roof of my car, and it worked just fine)
techstream-toyota-smart-key-6
Press “Pre-Start Check” button and review registration process
techstream-toyota-smart-key-7
techstream-toyota-smart-key-8

How to Register A New Smart Key:
  • Press “Start” button to start registering process
  • Within 30 seconds touch engine start switch/button with your registered smart key. You will hear one beep
techstream-toyota-smart-key-9
  • Within 30 seconds remove the registered key from the vehicle, place the new unregistered key into the vehicle, and touch the engine start switch/button with the unregistered smart key. You will hear one beep
  • Place the key on the passenger seat. New smart key registration is complete!
techstream-toyota-smart-key-10
  • Test new smart key to verify it is working
  • You can press “Next” to register more keys, or “Exit” to finish.

Monday, November 4, 2019

Techstream Program Toyota prius New or Used Smart Key

Got my Mini VCI cable today
Had an extra Remote for my Prius (Smartkey) and figured let’s put the techstream to test…
watched the video https://www.youtube.com/watch?v=8SivdN83i4E
and it was very similar
just chose your car and chose with smartkey and connect.
in techstream you have to go to the BODY tab
then SMartKey
a new tab opens with SMARTKEY LIVE on top
you can erase your old keys and end up with 1 and you can add new codes
it is very simple to follow
====
I was not successful as I had a 3 fold problem
1) you need to have the car on ACC .. meaning press the GO button 2 times without touching the brake for the techstream to do its thing … I left the brake lights on and I was sitting in the car trying to figure this out so my car battery Died!
2) it took me a while because Id id not realize that the remote battery is dead.. so I went and found the battery installed it and come back.
3) the laptop battery died on me now
anyhow once the car battery died I was done playing in the cold and dark outside with no laptop battery …
so lessons learned
1- charge your laptop fully,
2) make sure your remote battery is good
3) do not leave any light on when your car is on ACC and do not take your time … do your readings before turning on the car
I had 2 remotes installed and I was able to erase and leave only one . so techstream works..
the programming of the additional Key did not take.. not sure if the battery I put in was weak or because the car battery was dying by then..
prius-key-mini-vci
Finally, I figured it out
was able to programming smart key used or new

I am here to put this to rest and collect all the info in one place, since I saw this question all over with no solid answer

Thread:
SMART KEY Remote FOB Programming New or Used Toyota Highlander / Prius

You need:
– Techstream software
– MINI VCI cable or compatible cable (Mongoose MFC)
– Compatible remote
– Used Remotes need a PASS CODE from TIS (can get it from online services or an authorized locksmith/dealer with access to TIS, or someone with the Keygen)
———
– Techstream software (you get it with the cable or you can find it around the net)
– Cable: just go to http://www.obdii365.com/wholesale/mini-vci-for-toyota-with-toyota-tis.html or search for techstream cable on Google
– The drivers for the cable – works well on XP but for win 64bit you need to manually install x64 drivers.
-The remote with working batteries of course. needs to have the Same FCC ID and the same transmitter ID which is printed on the inside on the circuit board.
Mine for 2008 hybrid highlander with hatchback power
FCC ID HYQ14AAB
Toyota part# 8990448110
transmitter ID: 271451-0140
If your remote is virgin and has never been programmed you are good to go, if not perhaps if you bought a used one: you need to do smartkey reset via techstream and it will ask you for a passcode.
it gives you a 96 character code + vin # of the car you can get the passcode using those 2 on some website (20-30$) or from a dealer/locksmith
If the smartkey is brand new you can just use techstream and program it
turn on the car like you are going to drive it but leave it in park, this way your battery will not drain while you work, make sure your laptop is fully charged.
Install the drivers for the cable and install techstream make sure it runs
connect the cable to obdII socket and your USB and in techstream connect to the car
make sure that is your car in the menu and chose WITH SMART KEY option.
in techstream: body electrical> smart key> utility>
New remote> key code registration and follow the prompt very easy.
Used remote> Smart key reset with the drivers door open for the whole duration of programing and the car on fully so the battery does not die. Get the SEED code , do not close the techstream till you get the passcode , if you close it the smart key reset code will change.
get the passcode and put it in .. wait 16 minutes .. the program is slow do not freak out if the screen disappears just put your own timer for 16 min.
then register the remote.. using Register Key CLASSIC.. chose 3rd option ” I have already reset the smart key”
program your used key first
then your original key and you are done.
FOR PEOPLE WHO NEED THE TIS PASSCODE: it goes for around 30$ online or you can buy the program for 400$ from china to generate it. the program comes on a USB dongle and only works from the dongle, I have not found the hack for that.
If you have a dealer friend or locksmith friend they should be able to hook you up.
I might be able to hook you up with SEED code for 14.50$ from a local locksmith friend of mine. send me a pm if you need it.
I have the Passcode calculator program but it does not work without the USB dongle if anyone can crack it and extract the algorithm or make it work without the dongle we can all get our passcodes for free
========
UPDATE: I was doing a family members 2013 prius
stay with the older version of techstream as seed code.

Sunday, November 3, 2019

Install Techstream V12 VMware for VXDIAG Toyota to read AHC ECU

Getting Techstream up and running can be a bit of a pain. Hopefully this helps someone get started quickly.
Step 1: Purchase an OBD-II interface.
Option 2:
– VXDIAG VCX NANO Toyota
http://www.obdii365.com/wholesale/vxdiag-vcx-nano-for-toyota-tis-techstream-compatible-with-sae-j2534.html (not only works for diagnosis and customization but also ecu programming)
vxdiag-vcx-nano-install
Difference of the two:
With MINI VCI cable, for the most part they work. On some cars they will not be able to connect or cause error codes.
The VXDIAG VCX Nano uses it’s own firmware. It connects and reads codes much quicker than a Mini VCI cable.
Step 3: Install VirtualBox Software You Just Downloaded
– Windows: Double-Click downloaded file
– MacOS: Double-Click downloaded file, run installer
Step 4: Download TechStream Image:
– MEGA link: https://mega.nz/#!fsEizJyC!aH_2a1hQnX6LpicDS1Bq-gEKVEU57cotd3_QesN2_M0(TechStream 12.20.024-v2 .ova)
Step 5: Double-Click downloaded file.
Connect & Enjoy.


Operating system tips and guides:
Vista, Win7, 8 and 10 do actually have 32bit versions available
They are often preinstalled on cheaper mini laptops and the like.
The retail versions of the OS often gave you the option to install either the 32bit or the 64bit versions.
The drivers for the cheaper listed cable says it only supports XP and 7 however.
Its no doubt possible to get it working in later OSs though, but it could be painful.
If in doubt though, Virtualbox should do the trick.

Reasons to package everything into a virtual machine image:
– Security: Everyone’s essentially running cracked versions of TechStream from an unknown source. There’s a non-zero chance of ransomware slipping into one version. Running the software in an isolated virtual machine is a layer of security here.
– Portability: The software only runs on Windows. Using a virtual machine image allows the software to run on virtually any computer.
– Access: The software ships on CDs (sometimes mini-disks). Lots of laptops don’t have CD drives, and any ‘slot-type’ drive won’t accept mini-disks.
– Ease: Drivers for the two popular cables are pre-installed with a recent version of TechStream. It’s basically just download and run.
That said, if you are running a Windows machine and can follow the instructions included by the seller, there’s no reason you *have* to use a virtual machine.


Techstream VMware questions and answers:

I noticed with my ’98 LC that I don’t have a ton of settings that I can adjust, is that what others are seeing?
For example, I’d like to adjust my wiper delay and keyfob unlock settings, but it looks like they’re not available. Is there a list of accessible settings for each year of vehicle?
I don’t have very many settings in my ’02 LX.

I have a Mac. Have you tried that interface with Apple?
I successfully run this setup on a Mac with the VXDIAG VCX NANO Toyota interface

Working with AHC pressures?
I am able to read the AHC ECU (And All ECUs for that matter) using the VXDIAG OBD-II interface. I also purchased a Mini-VCI cable and was unable to communicate with the AHC ECU, but had no issue reading the other ECUs. Again, possible I just had a bad Mini-VCI cable.
In the linked image above, drivers for both interfaces are pre-installed.

Anyone have any experience with the wired vs wireless OBD interface? I’m wondering if its worth an additional 50 dollars for the VXDiag version.
I’m not sure if you’re referring to the VXDiag model I linked to in the OP. If you are, it isn’t wireless. I’d probably just purchase the Mini VCI cable first, and if that works for you, perfect. If it doesn’t, return it within 30 days and buy the VXDiag if necessary. It’s the techstream software that’s doing the heavy lifting, so theoretically (if they are both good cables), each will give you identical functionality.
I only purchased the VXDiag because I was having issues reading AHC trouble codes, and those two interfaces use different drivers.

What exactly does Techstream allow us to see/modify?
For LX, and LC owners with AHC, Techstream allow us to see AHC pressures + trouble codes. Even without AHC it allows everything from basic ‘check engine’ light diagnosis, key programming (May only be 04+?), and adjustment of some settings like ‘roll down my windows when I unlock the car’ — the adjustable preferences differ with different model years. Not too many on my ’02 LX, but I believe the folks with newer LC/LXs have more options.

Does Techstream get into ABS codes?
YES, it does.