Tuesday, August 14, 2018

Lexus GS300 and CT200 ABS Bleeding with Techstream

Look here: how to flush my brakes on an 06′ GS-300 and a 13′ CT-200, using a Techstream scanner


What is ABS Bleeding:
ABS Bleeding is used to purge air from the hydraulic braking system

What for Toyota ABS Bleeding:
I purchased the Mini VCI Toyota Techstream kit off obdii365.com

Car: a 2006′ GS-300 and a 2013′ CT-200

Time: flushed my brakes on both cars in three hours. The GS took a bit longer (more steps)

Operation system: the software on a 32-Bit windows OS,Using Windows 8.1 on an old Vista machine.

Software install and connection:
Basically install the software on a 32-Bit windows OS,Using Windows 8.1 on an old Vista machine.
Then load the driver, connect to the OBD-2 port the then run the software.
Click connect to Vehicle and follow the screen shots.
It’s part old fashion two man bleed(pump pedal then crack the bleed screw) and part car purging air from the lines electronically.


ABS Bleeding with Techstream:
Utility selection menu: ABS Bleeding
techstream-lexus-abs-bleeding-1
Car: LEXUS GS300 2006
Engine: 3GR-FSE
techstream-lexus-abs-bleeding-2
ABS Bleeding is used to purge air from the hydraulic braking system
Note: when bleeding, ensure that the fluid level does not drop below the indicated minimum line on the resevoir
techstream-lexus-abs-bleeding-3
Increase inline:
(FR/FL/RR/RL)
  • Connect the vinyl bleeder tube to one of the four bleeder plugs
  • Depress the brake pedal several times, then hold the pedal down
  • While holding the pedal down, loosen the bleeder plug to allow brake fluid to drain through the connected tube
  • When fluid stops draining, tighten the bleeder plug, then release the brake pedal

Repeat the process until the air stops coming out.

When finished with all wheels, press Next to proceed
techstream-lexus-abs-bleeding-4
techstream-lexus-abs-bleeding-5
Increase inline:
(FR/RR)
Caution: when bleeding ensure that the fluid level does not drop below the indicated minimum line on the reservoir

Connect the vinyl bleeder tube to the bleeder plug at the right front wheel or the right rear wheel and loosen the bleeder plug

Caution: do not press the brake pedal for any of the remaining inhalation line screens
techstream-lexus-abs-bleeding-6
techstream-lexus-abs-bleeding-7
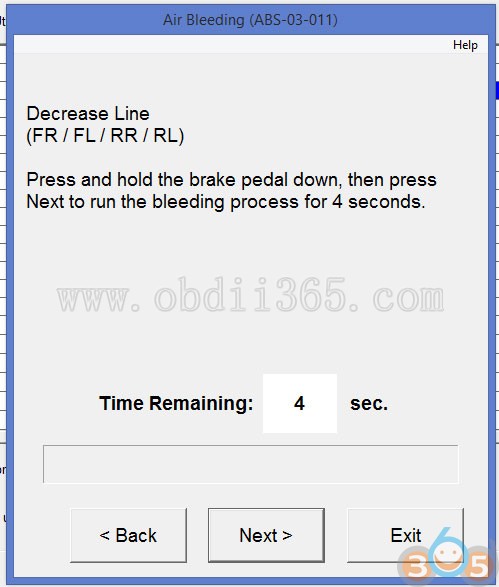
Decrease inline:
(FR/FL/RR/RL)
Caution: ensure that the fluid level does not drop below the indicated minimum line on the reservoir

Connect the vinyl bleeder tube to either one of the bleeder plug and loosen the bleeder plug

Caution: the next step requires the brake pedal to be depressed and held
Do not release the brake pedal while the 4 seconds bleeding process is running

Press and hold the pedal down, then press Next to run the bleeding process for 4 seconds

Tighten the bleeder plug, then release the brake pedal
Please wait for 20 seconds

Repeat this process until all the air in the fluid is completely bled out for FR and RR
Press yes to repeat this process, or press no to exit this process
techstream-lexus-abs-bleeding-8
techstream-lexus-abs-bleeding-9
techstream-lexus-abs-bleeding-10
techstream-lexus-abs-bleeding-11
techstream-lexus-abs-bleeding-12
techstream-lexus-abs-bleeding-13
Increase inline:
(FR/FL/RR/RL)
  • Connect the vinyl bleeder tube to one of the four bleeder plugs
  • Depress the brake pedal several times, then hold the pedal down
  • While holding the pedal down, loosen the bleeder plug to allow brake fluid to drain through the connected tube

Air bleeding is complete!
techstream-lexus-abs-bleeding-14
techstream-lexus-abs-bleeding-15
Job’s done!


Monday, August 13, 2018

How to reset Toyota Airbag SRS Computer Crash Data

How to: reset Toyota Airbag SRS Computer Crash Data. 

Step 1: Introduction
The airbag computer controls the supplemental restraint system in your vehicle, including the airbag sensors, inflators and seat belt pretensioners. It also acts as a black box when you get into a major collision that involved.
reset-toyota-airbag-crash-data-1

Step 2: Airbag Computer's Cannot Be Reused
Well if you decide to rebuild the vehicle and replace the airbags:
reset-toyota-airbag-crash-data-2

You need to replace the SRS computer, since it has a hard code inside that can’t be erased and you’ll be stuck with an airbag light on:
reset-toyota-airbag-crash-data-3
You won’t even be able to access the SRS computer using Toyota techstream software either.
reset-toyota-airbag-crash-data-4
Step 3: Remove the Airbag Computer
The airbag computer is located underneath the dashboard. The bottom half needs to be removed to access it.
Disconnect battery before working on SRS system
reset-toyota-airbag-crash-data-5
reset-toyota-airbag-crash-data-6
reset-toyota-airbag-crash-data-7
reset-toyota-airbag-crash-data-8
reset-toyota-airbag-crash-data-9

Step 4: Disasemble the Airbag Computer
Airbag computer removed:
Open up the computer:
We’re looking for this 8 pin SMD EEPROM chip here that stores the crash data, it says L56R on it
reset-toyota-airbag-crash-data-10
reset-toyota-airbag-crash-data-11
reset-toyota-airbag-crash-data-12
reset-toyota-airbag-crash-data-13
reset-toyota-airbag-crash-data-14
Step 5: Solder and Hookup to an EEPROM Reader
Solder some 32 gauge hookup wire to connect it to the serial
port EEPROM reader (lots of EEPROM reader options, CG100 is best for Japanese car airbag reset)
I built a little EEPROM reader using some resistors and diodes:
reset-toyota-airbag-crash-data-14
reset-toyota-airbag-crash-data-15
reset-toyota-airbag-crash-data-16
Here’s the setup, with the airbag computer EEPROM going to the reader, and then the reader going to the serial port directly on a legacy Pentium 4 computer. You can also purchase USB EEPROM readers
reset-toyota-airbag-crash-data-17
reset-toyota-airbag-crash-data-18

Step 6: Analyze Crash Data
Then I used PonyProg software which is a serial device programmer to read from the EEPROM chip:
reset-toyota-airbag-crash-data-19

Here’s what the crash data looks like:
reset-toyota-airbag-crash-data-20
From a clean, uncrashed Corolla, I dumped the information from its SRS computer and it looks like this:
reset-toyota-airbag-crash-data-21
Comparing the two, you can see a lot of data values have changed.
reset-toyota-airbag-crash-data-22
So now I’m going to replace all the values from the crashed chip with those from the virgin chip and rewrite it to the computer to clear the hard code. Then I’ll replace it into the vehicle

Step 7: Replace the Airbag Computer
So now I’m going to replace all the values from the crashed chip with those from the virgin chip and rewrite it to the computer to clear the hard code. Then I’ll replace it into the vehicle

Step 8: Test to Make Sure It Works
The SRS light should go out within 6 seconds if everything
is functioning normally. I also double checked it with Toyota techstream software and there aren’t any codes or faults found.
reset-toyota-airbag-crash-data-23
And It works!. 

Monday, July 2, 2018

Why are you advised to Install Techstream on Windows XP?

It’s possible to install Mini VCI cable Toyota Techstream software on Windows 7, Windows 8 and also Windows 10 32 or 64 bit, if you’re equipped with rich knowledge on computer. But actually, many people will not be able to follow the instructions on the web to install the necessary components. No judgement here, it is just reality.
Which is why I up telling people to stick with using an XP laptop instead.

That would be great if you have an XP laptop (or desktop) available…it is definitely a much easier install. But going forward I presume that will be harder to find. I thought the Win10 instructions were a little confusing but I worked thru it.

Note that if you’re not technically savvy, don’t even bother trying to install it on a 64-bit OS. You can double check by right-clicking on “my computer” and selecting “properties”. In the window that comes up, look for the “system type”, which is in the “system” section. It will indicate whether you have a 64 or 32-bit OS.
It is possible to get the drivers installed in a 64-bit environment, but it is not easy. I’m a computer person, and I couldn’t get it to work. Your best bet is an old laptop with Windows XP installed.
There are a number of threads here on PC regarding driver & Techstream installation in http://blog.obdii365.com/
You will be hard pressed to get any kind of “official” technical support, because the software that is bundled with these cheap adapters is pirated. To buy a techstream subscription from Toyota (even a very short-term one) is very expensive (much more than a used Win XP laptop will cost you).
Video: How to install Toyota Techstream on Windows XP?

Good luck!

http://blog.obdii365.com/2018/07/02/toyota-techstream-why-windows-xp-why-not-64-bit/

Monday, May 14, 2018

Mini VCI Toyota Techstream 13.10.019 Download Free


Free download TOYOTA TIS Techstream V13.10.019 for Toyota customization:
toyota-techstream-v13-10-019
It’s from Autoken shared in http://mhhauto.com/
No password but UNKNOWN SECURITY
TRY ON YOUR OWN RISK! Obdii365.com holds no responsibility of it.

Techstream V13.10.019 install:
It’s easy. Same as Techstream 13.00.022 software installation. Pls step by step install version 13.10.019 with the help of the Youtube video below.


Techstream 13.10.019 activation:
The Techstream v13 download link here for share info only; maybe it can help more people
If you want Techstream ACTIVATION KEY, pls go to Autoken!
Obdii365.com cannot help you with activation. Sorry!

You can post your techstream software id and will be helped to get the key.
toyota-techstream-v13-10-019-activation

Techstream compatibility:
You can try Techstream application with different tools, depending on your purpose.
Toyota mini vci, mangoose VCI cable: customization
Vxdiag vcx nano for toyota: customization coding, ecu programming


Techstream v12 v13 hints:
In the new Techstream version 12 or 13, there might be missing “Utility” and “Customize” buttons if you have no luck to have a working software cracked.

But no worries. Try the links here, of old Techstream versions:

Techstream software v11.20.019:
Techstream v11.10.034
Techstream download v11.00.017
Techstrean software v10.30.029
(registered key is necessary for some, but unnecessary for others)
In detail...
You can find out the one you want with “Utility” and “Customize” working perfect.

Good luck!

Wednesday, March 28, 2018

How to solve Toyota Techstream cannot customize settings?

Some users report Toyota TIS Techstream doesn't have a Customize Button problem recently:


User 1:
Brand new 2017 Toyota 4Runner Limited

Downloaded Techstream 12.00.127 and installed
Purchased this Mini VCI Cable at $16.

Drivers installed, I can see the cable, I can connect to the car when its in "ON" mode (two button presses without touching the break) but the customize button is not there.

The cable firmware is 1.4.1

Any ideas? What am I doing wrong?


User 2:
I'm in the same boat. Mini VCI with firmware 1.4.1, and Techstream 12.20.024. I can connect to the car, and see all the TPMS data, but there's no blue Utility button to enter new TPMS IDs.


User 3:
I loaded Techstream 12.00.127 and USB drivers, and I can read ECU's all day, but I can't edit the settings/not able to customize. In pictures and videos I watched there is a customize button, but that area is blank on mine. Any help is appreciated.

I turn the ignition ON (engine off) and when I connect it doesn't auto-detect the truck, but I can select 2017/Tacoma/Engine type/Smart Key so the version seems OK, and it does read the ECU data.

Manually entering data
Techstream-cannot-customize-1

Selecting the ECU I want to edit - shouldn't there be a customize button in the red markup circles?
Techstream-cannot-customize-2


Customer Solution:
Success!

I tried v12.10.019 and it worked!

The missing "Utility" and "Customize" buttons were there, and I was able to register the IDs for the TPMS sensors for my winter tires. I could see the new IDs, and it was picking up the pressure and temperature from them, so that all seemed to work. I also browsed through the Customize options.

Just in case it makes a difference to someone: after I uninstalled v12.20.024, I also deleted the Techstream directory in Program Files. The procedure to install v12.10.019 was identical to v12.20.024.

Some more details:
- Crappy old laptop running Windows XP 32-bit
- Mini VCI J2534 USB interface with firmware 1.4.1
- The laptop didn't have an internet connection when connected to the 2017 4Runner


Conclusion:
It is software (software crack) issue not the hardware. 

If you find your Teschtream don't have "Customize Setting" button and not able to customize, try a few older version V12.00.127, V12.10.019, v11.20.019 or older v10.30.029 etc.
techstream-Customize-Setting
Some need registration key, some does not.


http://blog.obdii365.com/2018/03/28/toyota-techstream-not-able-to-customize-settings-solution/

How to install Toyota TIS Techstream on VMware

Here's the customer solution to install Toyota TIS Techstream on Virtual Machine.


TIS-Techstream is the Toyota factory diagnostic tool (Technical Information System)

This is a very useful tool to have if you are a DIY type owner. Tons of useful features and visibility to trouble codes that are not available in generic OBD2 standard scanners. You can also customize options and run various diagnostics and reset procedures.. Like tire pressure sensors...

I had this installed in the past when it would only run on XP and just went through the process again recently.

Thought I would document what I did real quick to help others out as things have changed over time and it has become much easier.

You can get this for about $20-$30. It's obviously not legal (especially for commercial use).. but the hacked versions are out there and available...

You can now install Toyota TIS on a 64bit OS like Windows10... but I found it much simpler to just install a 32 bit VM like windows 8.1 and go from there. I just don't trust the software enough to run it directly on the host OS...

The issue I kept running into on 64 bit is that most antivirus software will see the drivers as suspect and give you fits on 64bit. So if you are going to run a VM anyway.. why not just run 32bit and keep it simple.

Also. You will need a Type 2 hyper-visor (like VirtualBox or VMWare workstation player). MS hyper-V will not work as it is Type1 and does not allow access to USB devices directly.

So here is what I did.

Step 0. Buy a mini vci cable from obdii365.com. It is cheap and come with the drivers and a version of TIS.

1. Intstall VM Ware workstation player
https://www.vmware.com/products/play...valuation.html I did this on windows.. but you should be able to do this on OSx also (I have not tried)

2. Get a simple 32 bit x86 windows OS VM image here
https://developer.microsoft.com/en-u...dge/tools/vms/
I grabbed 8.1 just to keep it simple. These have a 90 day limit. But should last you a long time if you keep it paused...plus you can just snapshot and rollback...

3. Import the VM file into the player

4. Install the MVCI Driver for Toyota.msi
if you don't have this on the disk that came with the cable PM me and I can send you one.

5. Download the latest TIS here
Free Download Toyota TIS Techstream 12.00.127 Crack 100% Working No Need Atcivation | OBDII365.com Official Blog

6. Uncompressed it with the password listed:mhhauto.com. I think it is a rar file so you may need to grab winRar,7zip or something similar. Put the files into a directory of your choice. VMWare player supports something called unity mode on windows.. This allows you to simply drag and drop files between the host and guess OS as it presents each running app as a simple window.. so you can uncompress all the files are your host OS... and just drag them over.

7.Run the GTS_...exe in the directory created in step 6 on the guest VM

8. Copy the MainMenue.exe file (created in step 6) manually to C:\Program Files\Toyota Diagnostics\Techstream\bin overwriting the existing file (keep key.txt handy for step 12)

9. Install JavaRuntime here https://java.com/en/download/ on the guest OS

10. Plug in your MVCI cable. VMware will prompt you to enable it in the VM (it typically shows devices in the top right corner)

11. Your VM desktop should have a MVCI firmware update tool shortcut. Run that and click the INFO button to make sure you can communicate with the USB cable...

12. Start up Techstream. Go to Setup->Register Techstream Enter reg key from key.txt in step 8

The free version of VM ware player does not allow snapshots.. So a good idea is to make a full copy in Documents\Virtual Machines\[name] so you can rollback...


Credit to wfo9 from Toyota 4runer forum. We take no responsibilities for viruses.. that could exist in these files, but the VM isolation should keep you pretty safe from contamination.


Toyota Techstream V13.00.022 New Update Features

Toyota TIS Techstream Software Release Notes:

Version 13.00.022 Software
Last Updated: 1/30/2018

Full Support:
2018 and Earlier Model Years
All Models are currently supported 2019 Vehicle Coverage

'19MY Lexus

GS F
NX300
NX300h
RC F  

'19MY Toyota
86
Avalon
C-HR
Yaris

Partial Support

'19MY Lexus '19MY Toyota

ES300h Avalon HV
ES350 Corolla
Hilux
Prius C


CUW "Now Processing"


Description:
Added term "Now Processing" during CUW pre/post processing during reprogramming.

Applicable Models/Systems:
Calibration Update Wizard


System Path:
CUW


ECU Data Read/Write Functionality


Description:
Function added to enable read/write of old ECU data to new ECU.

Applicable Models/Systems:
Multiple ECU's


System Path:
Chassis System / Utility


Starter Exchange Information Reset

Description:
Functionality added to clear the Stop & Start ECU starter operation counter.

Applicable Models/Systems:
2018 Highlander - Stop & Start System


System Path:
Stop & Start ECU / Utility / Starter Exchange


ECU Exchange

Description:
This utility is used to write data from the previous (replaced) ECU to the new replacement Stop & Start ECU.

Applicable Models/Systems:
2018 Highlander - Stop & Start System


System Path:
Stop & Start ECU / Utility / ECU Exchange


Reset Air Conditioner Information


Description:
This utility is used to reset the Stop & Start ECUs Air Conditioning status information. This information indicates whether the vehicle is equipped with an Air Conditioning ECU or not.

Applicable Models/Systems:
2018 Highlander - Stop & Start System


System Path:
Stop & Start ECU / Utility / Reset A/C Information


Deceleration Sensor Zero Point Calibration

Description:
This utility is used to perform the zero point calibration of the deceleration sensor for the Stop & Start system.

Applicable Models/Systems:
2018 Highlander - Stop & Start System


System Path:
Stop & Start ECU / Utility / Deceleration Sensor Zero Point Calibration


Deceleration Sensor Zero Point Clear

Description:
This utility is used to clear the zero point value for the deceleration sensor of the Stop & Start system.

Applicable Models/Systems:
2018 Highlander - Stop & Start System


System Path:
Stop & Start ECU / Utility / Deceleration Sensor Zero Point Clear


Integrated Current Value Initialization


Description:
This utility is used to initialize the Integrated Current Value for the Stop & Start system.

Applicable Models/Systems:
2018 Highlander - Stop & Start System


System Path:
Stop & Start ECU / Utility / Integrated Current Value Initialization

Sunday, March 25, 2018

How to Install Toyota Techstream V13.00.022 on Windows 7

Toyota TIS Techstream V13.00.022 software has been tested and verified working great on Windows 7.

Software version: V13.00.022
(It’s crack version. Does not need activation)
techstream-v13
Operation system: Windows 7 32 bit

Toyota Teschstream v13.00.022 has been tested OK with:
Mini VCI cables (SV46-D, SV46-B), Mangoose VCI (SV46-C) and Vxdiag Vcx Nano for Toyota


How to install Toyota Techstream 13.00.022 software?
Step 1: Install Setup
Open Techstream V13 software CD
Copy and paste MVCI driver and Techstream_Setup files to desktop
install-techstream-v13-1
open Techstream_Setup_v13.00.022 application
choose a setup language for installation
install-techstream-v13-2
preparing setup
Click on Next to install setup
Accept license agreement
install-techstream-v13-3
Click on Next
Enter the user name and company name, then Next
install-techstream-v13-4
Click on Install
install-techstream-v13-5
Finish Setup installation

Step 2: Install MVCI drvier
Run MVCI driver for TOYOTA TIS SETUP
Next to install MVCI driver
install-techstream-v13-7
Click on Install
install-techstream-v13-8
installing MVCI driver
Finish MVCI driver installation
install-techstream-v13-9

Step 3: TIS Loader
Copy Toyota new genkey folder->Toyota->TIS loader and paste to C://Program Files/Toyota Diagnostics/Techstream/bin
by following this way:
Right click Techstream on desktop->Properties->Open File Location
install-techstream-v13-10
install-techstream-v13-11
Send TIS Loader to desktop
install-techstream-v13-12
Delete Tecshtream shortcut on desktop
install-techstream-v13-13
Step 4: Install device driver
Connect MINI VCI usb interface with computer
Windows detect device driver automatically
install-techstream-v13-14
Open MVCI Firmware Update Tool->Device Info to check firmware information
Firmware version: V1.4.1
install-techstream-v13-15


Open Toyota TIS loader shortcut on desktop
Accept Java runtime notice by clicking on Yes
install-techstream-v13-16
System will open Windows IE explorer, close and ignore them
Run Techsteam v13 software and start diagnostic
install-techstream-v13-17
install-techstream-v13-18
install-techstream-v13-19
install-techstream-v13-20