Friday, June 24, 2022

Mini VCI 1.4.1 or 2.0.4 for 2002 2007 Lexus SC430?

 What Toyota Techstream cable works on old Lexus SC (2002 SC430 and 2007 SC430)?


The cable firmware version should be considered. The firmware communicates with your vehicle and the software provides diagnostic functions.


People have tested both cables firmware versions but v1.4.1 will only work on 2002 and 2007 SC430s. V2.0.4 will not communicate with the SC430s but will communicate with relatives 2010 Camry.


Mini VCI firmware V1.4.1: Yes


Mini VCI firmware V1.4.1 lexus sc430 1

works very good on

2002 SC430

2007 SC430

2004 Tacoma and other old Toyotas

Tested 1.4.1 cable and ver 10/ ver 12 software that worked with both 02 and 07 SC.

Mini VCI firmware V1.4.1 lexus sc430 2

Mini VCI firmware V1.4.1 lexus sc430 3

Mini VCI firmware V1.4.1 lexus sc430 4

Mini VCI firmware V1.4.1 lexus sc430 5

Mini VCI firmware V1.4.1 lexus sc430 6

Mini VCI Firmware 2.0.4

the firmware ver 2.0.4 and software version 12 work with 2007 SC430 but don’t work on 2002 SC430 (k-line).

This was using v2.0.4 on 2007 SC430, unable to connect to VIM.

Mini VCI Firmware 2.0.4 lexus sc430 1

Mini VCI Firmware 2.0.4 lexus sc430 2

VXDIAG VCX NANO for Toyota

vxdiag does not work on 2002 SC either. It works fine with 2007 SC. 

It is a known problem of vxdiag, failed to work on 02 03 Toyota K-line protocols.

But on newer cars, neither of the 1.4.1 or 2.0.4 cables will reprogram TPMS sensors when switching wheels, replacing sensors, etc.  The hardware cable solution most frequently mentioned there is to get a VXDIAG VCX NANO.


Carista OBDII: No

Carista only does basic OBDII readouts for older vehicles (like 2002 Toyota/Lexus models).

Carista will not work on lexus SC. But it works well on LS series. 


How to choose among these cables?

If need both new and old Toyota, mini vci v1.4.1 is good and cheap option.

If don’t have K-line Toyota, choose mini vci 2.0. 4 and vxdiag.

mini vci is very limited on Toyota/Lexus hybrid but vxdiag performs well.

vxdiag vcx nano does no tpms programming, mini vci does not. vxdiag is faster than mini vci.

Wednesday, June 22, 2022

Mini VCI Techstream Program Toyota Prius Gen3 Key Fob

 Tutorial: Toyota Prius Gen3 Hybrid vehicle key fob programming – step by step using Mini VCI Toyota Techstream with pictures.


NOTE: Here the guy used Techsteam 13.00.022 so the steps and pictures may be different from your version.

Introduction:
For Gen2, you can program a key fob using the chicken dance. Google it if you don’t know.

Starting with Gen3, there is no chicken dance. There are 4 ways to add smart key to Prius Gen3.

  • 1). Buy a virginized (sometimes called “reset”) smart key on Ebay simply register (add) it with Techstream or other high-end automotive scan tools. No seed code is required.
  • 2). Reset your used smart key then do step #1. Most auto locksmiths can reset Toyota G3 fobs with Xhorse Key Tool Max or similar.
  • 3). Reset the smart key ECU on the car using seed/passcode approach and Techstream. Then re-register all your fobs, even if they are not virginized. Just make sure you REGISTER your fobs within 10 presses of the cars START button after car is reset. If not, there’s a chance you’ll brick the car.
  • 4). Just pay an auto locksmith to do it. We charge $75 to cut and program a customer supplied fob. We often use our Autel IM608 immobilizer tool and Xhorse Condor key cutting machine. These tools cost thousands of dollars so if an auto locksmith will do it for $75 it’s a fair price to have it done in 20-30 minutes.

The cheapest way to program a new key fob to work in your Prius is with the Toyota Techstream software. This is proprietary software that Toyota service technicians use to work on Toyota vehicles. Officially, this costs over $1,000 (link to techinfo.toyota.com flyer) but you can buy a pirated version off obdii365.com for less than $35.
Other options would be to go to an automotive locksmith, go to your Toyota dealership, or buy an expensive tool (like AUTEL).


Materials:

  • Old laptop that has USB port and running Windows. I’ve heard that it’s preferable to have 32-bit Windows, but I used Windows 7 64-bit and that worked for me. If you have to buy an old laptop to do this, then maybe the cheapest/best avenue for you is to go to an automotive locksmith.
  • Mini VCI cable & Techstream software – I bought my version from obdii365.com for $32.99 with high rating and 100% positive feedback. Make sure what you’re buying is a physical cable AND the Techstream software. Many listings for less than $20 are only selling the cable plus “drivers” on a CD (which is NOT the Techstream software). If you only have the cable, you may be able to get Techstream software from bitTorrent or another fileshare service, but I would recommend you just go ahead and buy the complete set there.
  • New key fob – Toyota calls this a “Transmitter”. There may be 2 versions depending on which model you have. I bought Part # 89904-47230 from an online Toyota dealership for ~$100. You can certainly buy it from eBay but make sure it’s a new key fob that’s never been paired with a car before. Otherwise, you need to perform extra steps to return/reset the used key fob to a “new state”, which I do not cover in this write-up.
  • Blank key – I bought Toyota Part # 69515-52120. This is the physical key to unlock your doors if you lose/break your key fob or if the key fob battery is dead. You’ll need to take this to a locksmith to cut for you.

Mini VCI Techstream Program Toyota Prius Gen3 Key Fob 1

Step by Step:

  1. Before installing Techstream, I turned off wifi on my laptop (to avoid Techstream from attempting to connect to Toyota servers). Then go ahead and install Techstream software onto your laptop. My version came with instructions that were not very precise. For example, it would tell me to run a file called “Setup.exe” when it was really something like “TIS SETUP.EXE”. Also, I had to install 2 drivers in Windows Device Manager (not just 1). So just take your time and puzzle through the instructions. During installation, it also said I needed a newer version of Java. I went ahead and clicked Cancel. Installing Techstream software is the most difficult step. The remaining steps are easy.
  2. Go to your Prius and open the driver door. Keep this door open the entire time. Use a trash can or something to prop it open if you have to.
  3. Open up the Techstream software (if it’s not already open). Connect the Mini-VCI cable to your laptop. Connect the other end of the cable to the OBDII port under your steering wheel. DO NOT press the brake pedal. Press the POWER button. Your Prius should be ON, but ENGINE OFF. Then press “Connect to Vehicle” on the top left.
  4. See Pic1. Input your vehicle information into the pop-up window. I selected “w/ Touch Sensor”. I assume that refers to the functionality to lock your doors by touching that area on your driver door handle. Press Next.

Mini VCI Techstream Program Toyota Prius Gen3 Key Fob 2

5. See Pic2. After waiting about a minute, you’ll encounter a selection screen. Select “Smart Key” and click the green arrow on the bottom right. Depending on your version (or maybe your vehicle), you may see different names for these features. For example, it may say “Immobilizer”. So choose the selection that sounds like what you need to program your key fob.

Mini VCI Techstream Program Toyota Prius Gen3 Key Fob 3

6. See Pic3. In the next screen, click Utility on the left. Then choose “Smart Code Registration” and click the green arrow on the bottom right to continue.

Mini VCI Techstream Program Toyota Prius Gen3 Key Fob 4

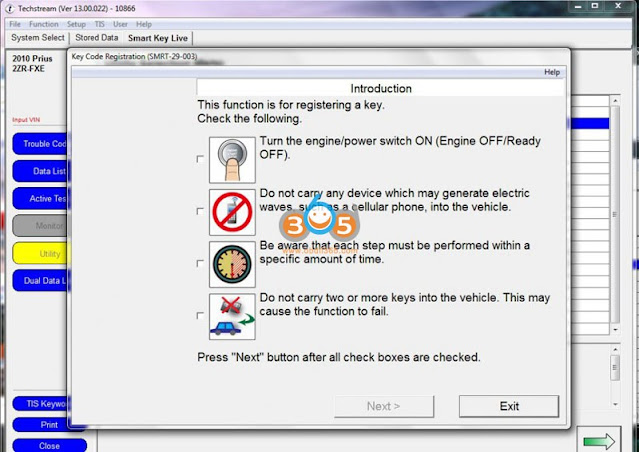
7. See Pic4. You will now see a popup window with a checklist. Go ahead and read it and check them off. Then press Next.

Mini VCI Techstream Program Toyota Prius Gen3 Key Fob 5

8. See Pic5. The next window tells you how many key fobs are currently paired to your Prius and how many more key fobs you can pair. In my case, I have 2 key fobs paired and I can pair an additional 5. Press Next.

Mini VCI Techstream Program Toyota Prius Gen3 Key Fob 6


9. See Pic6. Following the instructions on the next screen, place the NEW unpaired key fob outside of the Prius. Keep your OLD working key fob inside the Prius. Press Next.


Mini VCI Techstream Program Toyota Prius Gen3 Key Fob 7

10. See Pic7. The rest of the steps are timed so be ready. You should probably read this forum posting to the end so you know what’s coming. If you press the “Pre-Start CHK” button, you’ll see a Help window showing you the procedure (see Pic8). Then press Start.

Mini VCI Techstream Program Toyota Prius Gen3 Key Fob 8

Mini VCI Techstream Program Toyota Prius Gen3 Key Fob 9

a) You’ll have 30 seconds to hold your OLD existing key fob to the POWER button in the Prius. You’ll hear a beep.

b) You’ll have another 30 seconds to take that OLD existing key fob outside of the Prius and bring in the NEW unpaired key fob into the Prius and hold it to the POWER button in the Prius. You’ll hear 2 beeps.

Now you’re done. Toyota Techstream register key completed. Congratulations!

Mini VCI Techstream Program Toyota Prius Gen3 Key Fob 10

Read more:

Instruction: Techstream Programs Smart Keys to Lexus, Toyota and Scion

Techstream Adds non-remote key to Lexus GX470 2006

Wednesday, June 8, 2022

Free Download Toyota Techstream V17.10.012 with Loader

 (06/2022) Latest version TOYOTA, LEXUS, SCION diagnostic software goes to V17.10.012.


Version 17.10.012 Software
Last Updated: 6/2/2022

Region: All regions
Type: Diagnostic tool Software
Languages: English, Multilanguage
OS: WinXP, Vista, Windows7, WIN8, WIN10

Compatible devices: VXDIAG VCX NANO Toyota (don’t need MVCI driver), Mini VCI J2534 Item #SV46-DSV46-D1


Fully Supported Models

2022 and Earlier Model Years

  • All Models are currently supported

 2023 Vehicle Coverage

’23MY Lexus’23MY Toyota

ES300h4Runner
GX460bZ4X
UX250h86
Camry/HV
C-HR
Hiace
Hilux
Sequoia HEV
Tundra/HEV


Free download Techstream 17.10.012 software

Techstream Setup v17.10.012.exe with patch 

https://mega.nz/folder/csNHnSQQ#qE_FpFWolJJCTZ-SyOx5jg

Driver MVCI for 32bit & 64bit operating system

https://mega.nz/file/y2hUUBgR#UHq6ETQn_7kfPvbqKMLL_484kvDpCHnnbbFksHUgf28

Free Download Toyota Techstream V17.10.012

How to install:

Step 1: Install Setup and Framework

Step 2: Install driver and set com port

Step 3: Activate software via patch

Step 4: Run software


Techstream V17.10.012 New Features:

A/C Coolant Replacement Mode

Description:
This function is used to transfer to the A/C Coolant Replacement Mode.

Applicable Models/Systems:
2023~ bZ4X – Air Conditioner

System Path:
Air Conditioner / Utility / A/C Coolant Replacement Mode


TRA Switch Indicator Inspection

Description:
This function is used to switch ON/OFF of TRA Switch Indicator by user operation forcibly.

Applicable Models/Systems:
2022~ TUNDRA – Circumference Monitoring Camera Control Module

System Path:
Circumference Monitoring Camera Control Module / Utility / TRA Switch Indicator Inspection


Capacity Measurement (Simple Judgment)

Description:
This function is used to perform the Capacity Measurement (Simple Judgment) of the traction battery.

Applicable Models/Systems:
2023~ bZ4X – EV Battery

System Path:
EV Battery / Utility / Capacity Measurement (Simple Judgment)


Capacity Measurement (Actual Value Judgment)

Description:
This function is used to perform the Capacity Measurement (Actual Value Judgment) of the traction battery.

Applicable Models/Systems:
2023~ bZ4X – Brake/EPB

System Path:
EV Battery / Utility / Capacity Measurement (Actual Value Judgment)


Rear LiDAR Beam Axis Adjustment

Description:
This function is used to adjust the beam axis of the Rear LiDAR.

Applicable Models/Systems:
2022~ LS500h – Rear LiDAR
2022~ MIRAI – Rear LiDAR

System Path:
Rear LiDAR / Utility / Rear LiDAR Beam Axis Adjustment


Right Side LiDAR Beam Axis Adjustment

Description:
This function is used to adjust the beam axis of the Right Side LiDAR.

Applicable Models/Systems:
2022~ LS500h – Rear LiDAR
2022~ MIRAI – Rear LiDAR

System Path:
Right Side LiDAR / Utility / Right Side LiDAR Beam Axis Adjustment


Left Side LiDAR Beam Axis Adjustment

Description:
This function is used to adjust the beam axis of the Left Side LiDAR.

Applicable Models/Systems:
2022~ LS500h – Rear LiDAR
2022~ MIRAI – Rear LiDAR

System Path:
Left Side LiDAR / Utility / Left Side LiDAR Beam Axis Adjustment


Rear LiDAR Beam Axis Misalignment Reading

Description:
This function is used to display the beam axis misalignment of the Rear LiDAR.

Applicable Models/Systems:
2022~ LS500h – Rear LiDAR
2022~ MIRAI – Rear LiDAR

System Path:
Rear LiDAR / Utility / Rear LiDAR Beam Axis Misalignment Reading


Right Side LiDAR Beam Axis Misalignment Reading

Description:
This function is used to display the beam axis misalignment of the Right Side LiDAR.

Applicable Models/Systems:
2022~ LS500h – Rear LiDAR
2022~ MIRAI – Rear LiDAR

System Path:
Right Side LiDAR / Utility / Right Side LiDAR Beam Axis Misalignment Reading


Left Side LiDAR Beam Axis Misalignment Reading

Description:
This function is used to display the beam axis misalignment of the Left Side LiDAR.

Applicable Models/Systems:
2022~ LS500h – Rear LiDAR
2022~ MIRAI – Rear LiDAR

System Path:
Left Side LiDAR / Utility / Left Side LiDAR Beam Axis Misalignment Reading


ECU Data Save

Description:
This function is used to read and save the memorized ECU data.

Applicable Models/Systems:
2022~ LS500h – Rear LiDAR
2022~ MIRAI – Rear LiDAR
2022~ LS500h – Right Side LiDAR
2022~ MIRAI – Right Side LiDAR
2022~ LS500h – Left Side LiDAR
2022~ MIRAI – Left Side LiDAR

System Path:
Rear LiDAR / Utility / ECU Data Save
Right Side LiDAR / Utility / ECU Data Save
Left Side LiDAR / Utility / ECU Data Save


ECU Data Write

Description:
This function is used to write saved data from the “ECU Data Save” utility to the new ECU.

Applicable Models/Systems:
2022~ LS500h – Rear LiDAR
2022~ MIRAI – Rear LiDAR
2022~ LS500h – Right Side LiDAR
2022~ MIRAI – Right Side LiDAR
2022~ LS500h – Left Side LiDAR
2022~ MIRAI – Left Side LiDAR

System Path:
Rear LiDAR / Utility / ECU Data Write
Right Side LiDAR / Utility / ECU Data Write
Left Side LiDAR / Utility / ECU Data Write

Monday, June 6, 2022

Free Download Toyota Techstream V17.10.012

 (06/2022) Latest version TOYOTA, LEXUS, SCION diagnostic software goes to V17.10.012.


Version 17.10.012 Software
Last Updated: 6/2/2022

Region: All regions
Type: Diagnostic tool Software
Languages: English, Multilanguage
OS: WinXP, Vista, Windows7, WIN8, WIN10

Compatible devices: VXDIAG VCX NANO Toyota (don’t need MVCI driver), Mini VCI J2534 Item #SV46-DSV46-D1


Fully Supported Models

2022 and Earlier Model Years

  • All Models are currently supported

 2023 Vehicle Coverage

’23MY Lexus’23MY Toyota

ES300h4Runner
GX460bZ4X
UX250h86
Camry/HV
C-HR
Hiace
Hilux
Sequoia HEV
Tundra/HEV


Free download Techstream 17.10.012 software

Techstream Setup v17.10.012.exe

https://mega.nz/file/3rwjjR5B#9jPh1CYu3l4_4Ow9tlUG8U3_NrN7bFV-pBIwqgGuInI

Driver MVCI for 32bit & 64bit operating system

https://mega.nz/file/y2hUUBgR#UHq6ETQn_7kfPvbqKMLL_484kvDpCHnnbbFksHUgf28

Free download Techstream Patch

https://mega.nz/file/3rpgCZDB#b9E3aCXLwhcS67ztHZWv1UF0GnIlyBIHwRz8XeTJmeE


How to install:

Step 1: Install Setup and Framework

Step 2: Install driver and set com port

Step 3: Activate software via patch

Step 4: Run software


Techstream V17.10.012 New Features:

A/C Coolant Replacement Mode

Description:
This function is used to transfer to the A/C Coolant Replacement Mode.

Applicable Models/Systems:
2023~ bZ4X – Air Conditioner

System Path:
Air Conditioner / Utility / A/C Coolant Replacement Mode


TRA Switch Indicator Inspection

Description:
This function is used to switch ON/OFF of TRA Switch Indicator by user operation forcibly.

Applicable Models/Systems:
2022~ TUNDRA – Circumference Monitoring Camera Control Module

System Path:
Circumference Monitoring Camera Control Module / Utility / TRA Switch Indicator Inspection


Capacity Measurement (Simple Judgment)

Description:
This function is used to perform the Capacity Measurement (Simple Judgment) of the traction battery.

Applicable Models/Systems:
2023~ bZ4X – EV Battery

System Path:
EV Battery / Utility / Capacity Measurement (Simple Judgment)


Capacity Measurement (Actual Value Judgment)

Description:
This function is used to perform the Capacity Measurement (Actual Value Judgment) of the traction battery.

Applicable Models/Systems:
2023~ bZ4X – Brake/EPB

System Path:
EV Battery / Utility / Capacity Measurement (Actual Value Judgment)


Rear LiDAR Beam Axis Adjustment

Description:
This function is used to adjust the beam axis of the Rear LiDAR.

Applicable Models/Systems:
2022~ LS500h – Rear LiDAR
2022~ MIRAI – Rear LiDAR

System Path:
Rear LiDAR / Utility / Rear LiDAR Beam Axis Adjustment


Right Side LiDAR Beam Axis Adjustment

Description:
This function is used to adjust the beam axis of the Right Side LiDAR.

Applicable Models/Systems:
2022~ LS500h – Rear LiDAR
2022~ MIRAI – Rear LiDAR

System Path:
Right Side LiDAR / Utility / Right Side LiDAR Beam Axis Adjustment


Left Side LiDAR Beam Axis Adjustment

Description:
This function is used to adjust the beam axis of the Left Side LiDAR.

Applicable Models/Systems:
2022~ LS500h – Rear LiDAR
2022~ MIRAI – Rear LiDAR

System Path:
Left Side LiDAR / Utility / Left Side LiDAR Beam Axis Adjustment


Rear LiDAR Beam Axis Misalignment Reading

Description:
This function is used to display the beam axis misalignment of the Rear LiDAR.

Applicable Models/Systems:
2022~ LS500h – Rear LiDAR
2022~ MIRAI – Rear LiDAR

System Path:
Rear LiDAR / Utility / Rear LiDAR Beam Axis Misalignment Reading


Right Side LiDAR Beam Axis Misalignment Reading

Description:
This function is used to display the beam axis misalignment of the Right Side LiDAR.

Applicable Models/Systems:
2022~ LS500h – Rear LiDAR
2022~ MIRAI – Rear LiDAR

System Path:
Right Side LiDAR / Utility / Right Side LiDAR Beam Axis Misalignment Reading


Left Side LiDAR Beam Axis Misalignment Reading

Description:
This function is used to display the beam axis misalignment of the Left Side LiDAR.

Applicable Models/Systems:
2022~ LS500h – Rear LiDAR
2022~ MIRAI – Rear LiDAR

System Path:
Left Side LiDAR / Utility / Left Side LiDAR Beam Axis Misalignment Reading


ECU Data Save

Description:
This function is used to read and save the memorized ECU data.

Applicable Models/Systems:
2022~ LS500h – Rear LiDAR
2022~ MIRAI – Rear LiDAR
2022~ LS500h – Right Side LiDAR
2022~ MIRAI – Right Side LiDAR
2022~ LS500h – Left Side LiDAR
2022~ MIRAI – Left Side LiDAR

System Path:
Rear LiDAR / Utility / ECU Data Save
Right Side LiDAR / Utility / ECU Data Save
Left Side LiDAR / Utility / ECU Data Save


ECU Data Write

Description:
This function is used to write saved data from the “ECU Data Save” utility to the new ECU.

Applicable Models/Systems:
2022~ LS500h – Rear LiDAR
2022~ MIRAI – Rear LiDAR
2022~ LS500h – Right Side LiDAR
2022~ MIRAI – Right Side LiDAR
2022~ LS500h – Left Side LiDAR
2022~ MIRAI – Left Side LiDAR

System Path:
Rear LiDAR / Utility / ECU Data Write
Right Side LiDAR / Utility / ECU Data Write
Left Side LiDAR / Utility / ECU Data Write